
This post may contain affiliate links. Please see our disclosure policy.
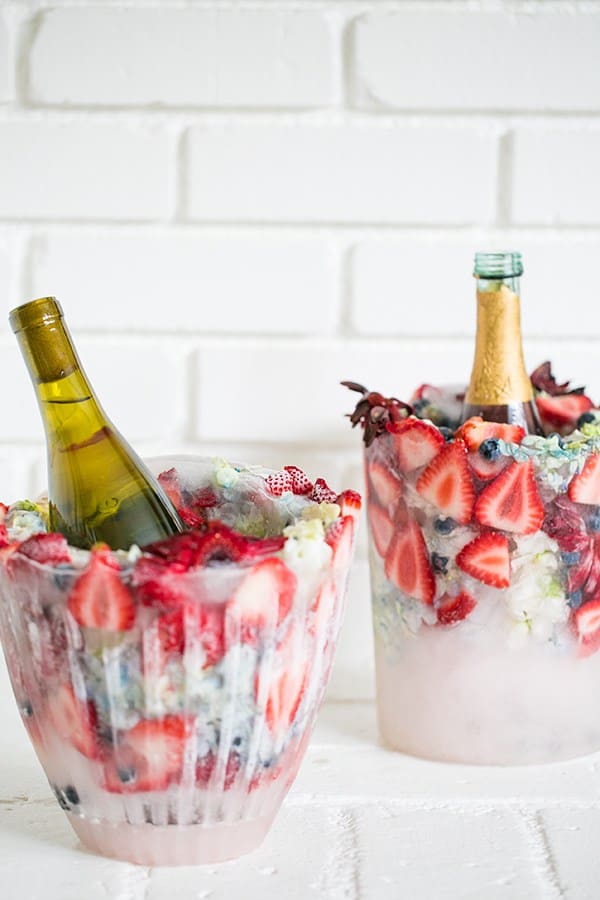
How to make a gorgeous champagne ice bucket without a mold! They’re so versatile and easy to make, great for a kinds of celebrations, from weddings to valentine’s Day! They won’t cost you much either and the results are amazing! Great for wine or champagne of course!
Pin this now to find it later
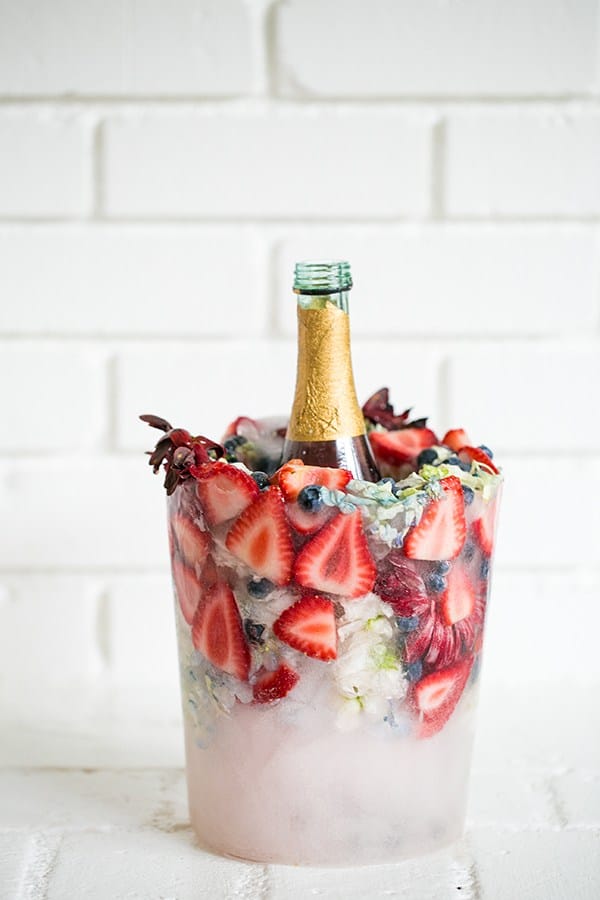
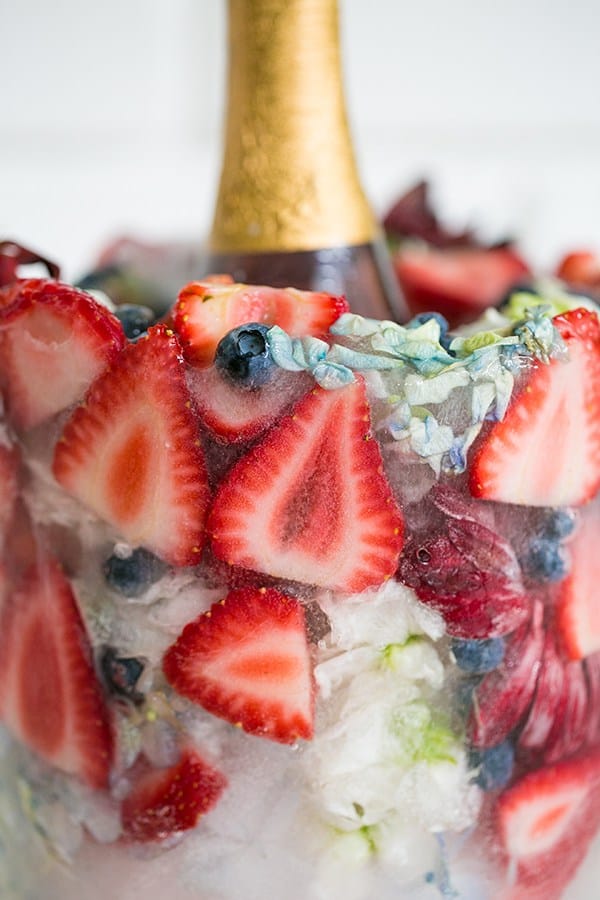
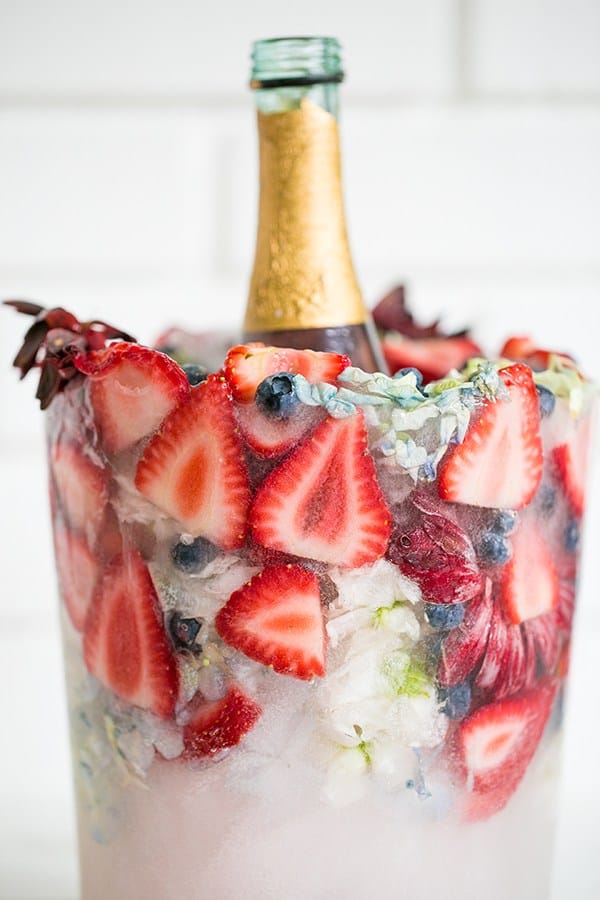
Pin ItKeeping Champagne and wine chilled has never look better with these charming DIY floral wine chiller buckets! They’re colorful, festive and can be fully customized. Imagine kiwis, apples and flowers!
They look beautiful sitting on a table and are perfect for summer entertaining. We love how they came out! See the how-to below. Cheers to DIY ice buckets!!
How To Make Wine Chiller Buckets
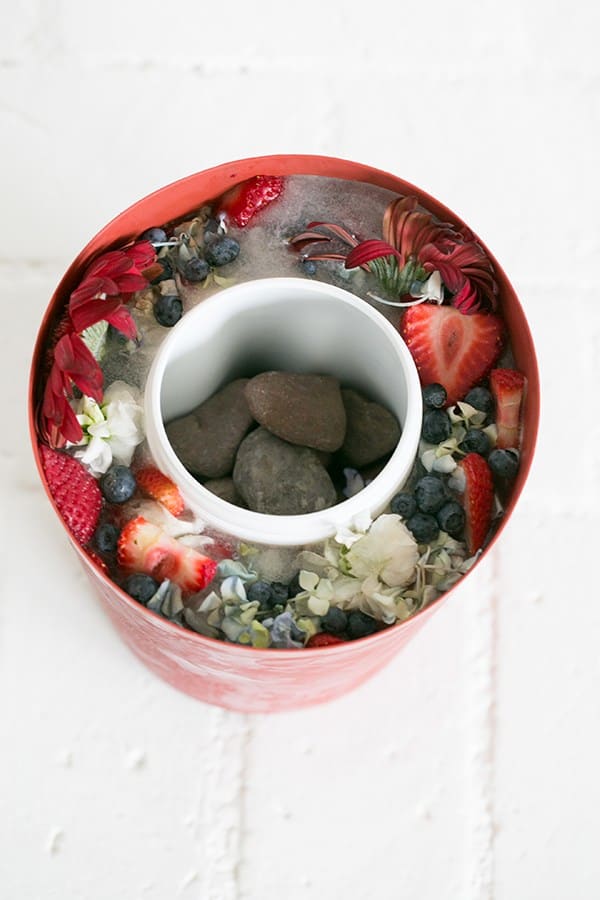
- Fill the large bucket with 2-3 inches water and freeze.
- Place the smaller bucket inside and fill it with rocks so it’s weighted. Otherwise it will float when then the water is poured in.
- Fill the circle with water and tuck the flowers and fruit in tight, so they don’t float to the top when frozen.
- You can also do this in two steps, filling half then freezing and then doing the second half. This will insure the flowers will be dispersed throughout the bucket when frozen.
- Freeze the bucket overnight.
- To remove the ice bucket, remove the rocks from the center, then fill that container with warm water and let it sit. Pour it out and then run water around the outside of the bucket. It will eventually loosen and slide out.
You just need some fruit and or flowers, a couple of cheap plastic pots, water and…rocks! The colorful frozen mosaics that emerge are simply stunning, they’ll be the most inexpensive (but gorgeous) centerpieces you’ve ever had.
Color Schemes For Your Wine Chiller Buckets
The beauty of this project is you can make multiple ice buckets, as many as your fridge can handle! Just make sure you are making them well ahead of time, as you need to freeze overnight.
You can get really creative with your ice buckets, using fruit, flowers, herbs and combining them in different color schemes, to suit your event.
One cool (no pun intended) scheme, is to match one ice wine chiller ice bucket with whites and another with rose. Go for some vibrant greens and yellows for white wines and then some lovely pastel reds for rose, it’s all about the detail!
Tips For Making Champagne Ice Buckets
- We highly recommend using plastic and galvanized buckets as glass can break.
- When serving, place it on a tray or container with a little ledge to catch the water.
- You can also fold a washcloth and set it underneath to absorb some of the water.
- When adding your fruit and flowers, you can freeze the bucket in layers, to allow for an even spread of fruit/flowers.
Check Out These Other Great Party Ideas
If you have tried this DIY champagne ice bucket or any other project on Sugar and Charm, then please rate it and let me know how it turned out in the comments below!
You can also FOLLOW ME on FACEBOOK, INSTAGRAM, and PINTEREST to see more delicious recipes, cocktails, desserts and party ideas!

DIY Ice Bucket
Ingredients
- 1 Water
- 1 Fruit
- 1 Flowers
Instructions
- Fill the large bucket with 2-3 inches water and freeze.
- Place the smaller bucket inside and fill it with rocks so it’s weighted. Otherwise it will float when then the water is poured in.
- Fill the circle with water and tuck the flowers and fruit in tight, so they don’t float to the top when frozen. You can also do this in two steps, filling half then freezing and then doing the second half. This will insure the flowers will be dispersed throughout the bucket when frozen.
- Freeze the bucket overnight.
- To remove the ice bucket, remove the rocks from the center, then fill that container with warm water and let it sit. Pour it out and then run water around the outside of the bucket. It will eventually loosen and slide out.


I do this for Christmas with cranberries and holly. I unmold from the outside bucket and set the ice block in a pretty glass serving bowl- it shows the fruit more and catches the drips.
What size of bucket did you use?
How do you fit the big bucket in your freezer?
I just moved stuff around. We have a tall side freezer.
This is absolutely beautiful! There are so many possibilities with flowers, fruits, and vegetables you could combine for all sorts of fun ice buckets! 🙂 I think that it would be a good idea once it starts to melt to just put it back into the bucket you molded it in and just have pretty decorations surrounding your drinks in the water! Thanks for sharing! 🙂
This is the most stunning thing I’ve ever seen!!! Pinning and definitely making!!
So what does it look like as things start to melt?
Are there wilted flowers and fruit spilling all over the table? Am I missing something?
Exactly! How long can you actually let this sit out before it starts melting and making a mess, water rings everywhere, puddles..?! Pretty, but doesn’t seem very practical.
I’d love to know the answer to this. Anyone have any experience to offer? Can the host actually relax or will constant, nervous jumping up to check the wine bucket be required? thx!
such a brilliant idea!!
Ok. STOP IT! This is so so good. Genius!