
This post may contain affiliate links. Please see our disclosure policy.
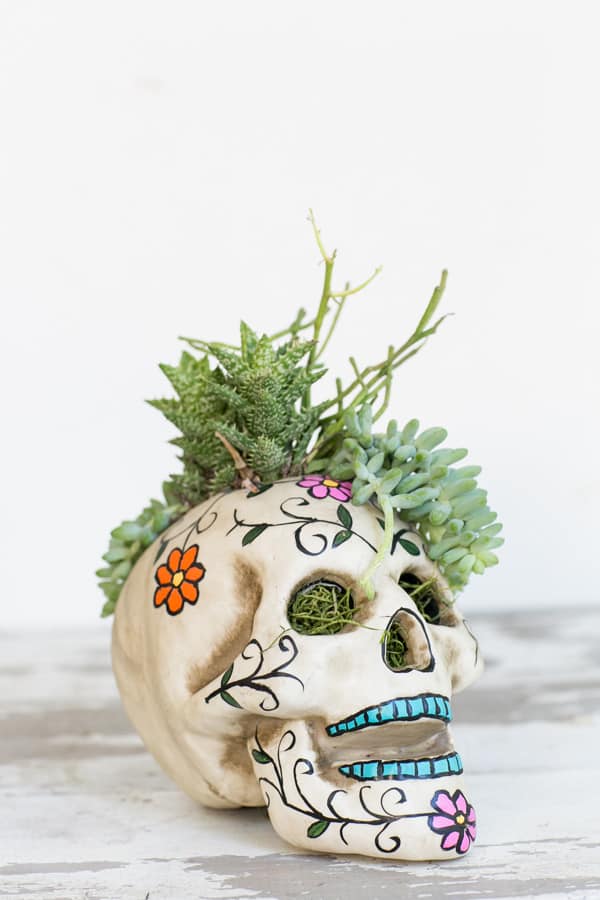
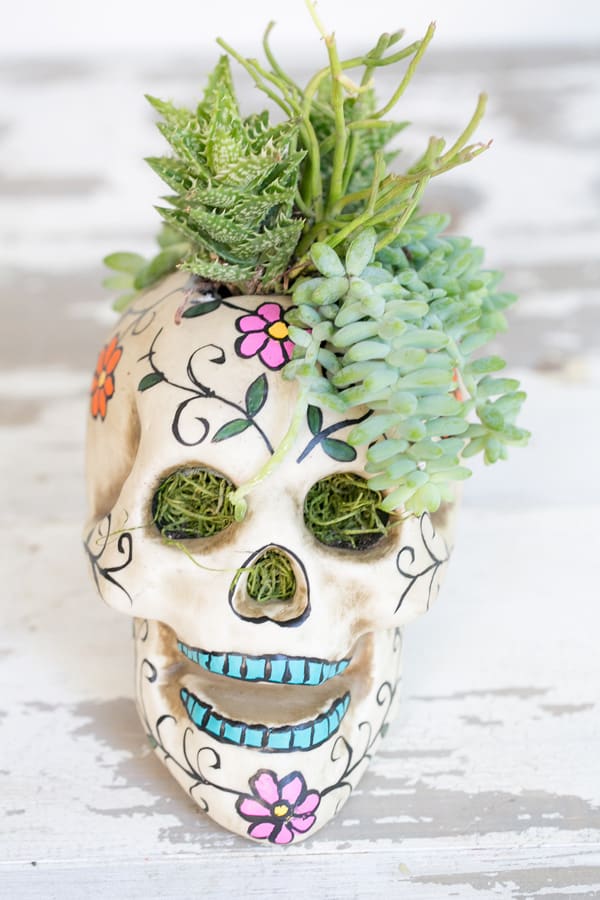
This Styrofoam skull planter makes the perfect Halloween centerpiece! It’s easy to make and looks so charming and festive! A great piece of decor for either inside or out.
Pin this now to find it later
Pin ItWe teamed up with Erin from White Fig Designs to create this adorable and easy Halloween centerpiece using a pre-decorated styrofoam skull and succulents! It’s so simple to make and lasts the entire month of October! I usually put out my Halloween decor items throughout the month of October. I’ve had this arrangement sitting on a cake stand in our kitchen and I love how festive and charming it is! It goes well with my fairy tale pumpkins, skeleton garland and candles. I think I’ll place it outside on Halloween night. Directions below!
How To Make This Skull Planter – Step By Step
What You’ll Need
1 styrofoam skeleton head (this one came pre-decorated at the LA flower mart, but most craft stores have something similar and in different sizes)
succulents
duct tape
knife
planting dirt
handful of moss
Directions
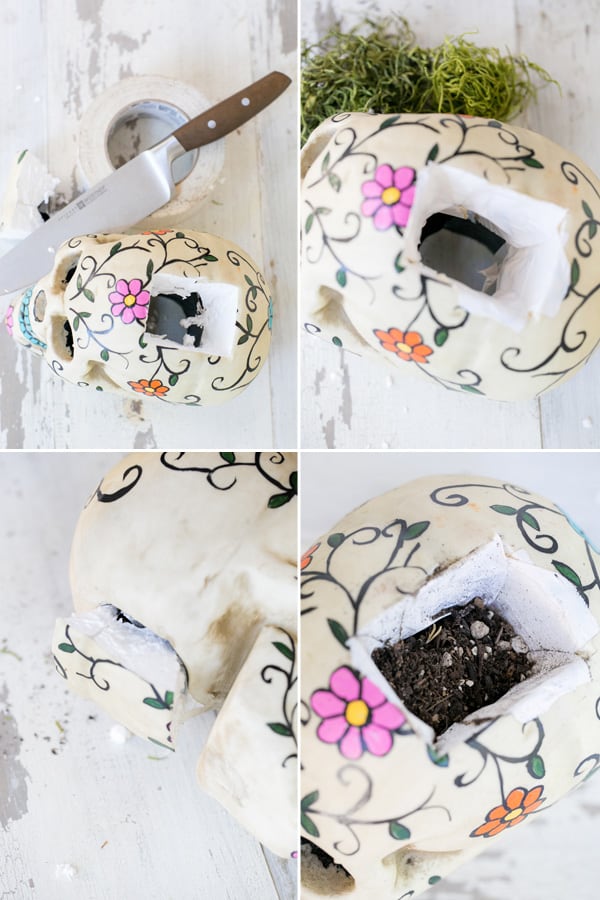
- Cut a hole in the top of the styrofoam skeleton in the shape of a square.
- Use that piece (that you just removed) to fit into the bottom of the skeleton if there is an opening. You might need to cut it to adjust.
- Fill the bottom with a handful of moss, make it come out of the eyes and nose.
- Use duct tape to tape around the edges of the hole, so the styrofoam doesn’t get too wet when watering the plants.
- Add in the dirt and plants.
- Sprinkle with water every few days and enjoy!
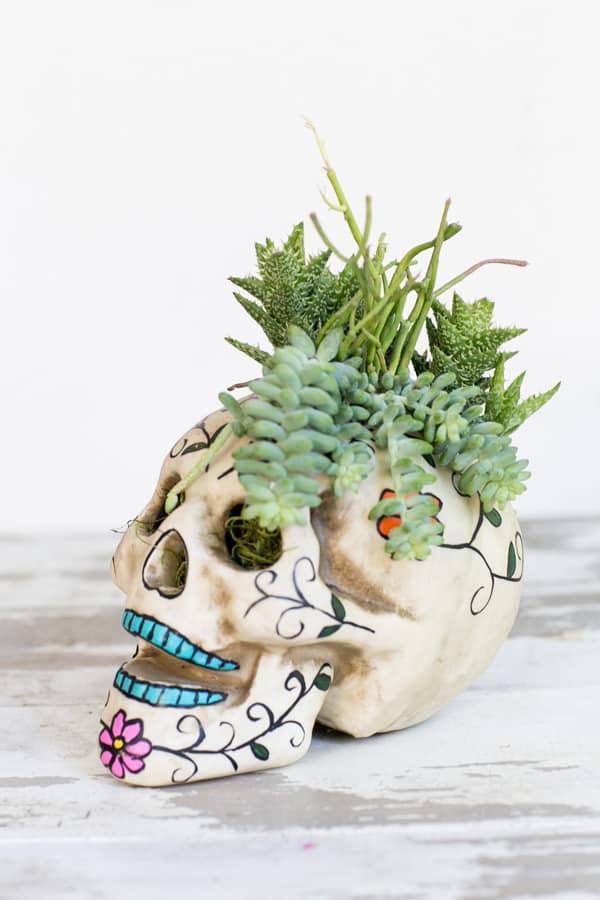
Skull Planters – An Easy DIY Halloween Decoration!
Of course pumpkins, ghosts, cobwebs and spiders will always be staples for Halloween decor, but this skull planter is not only different and charming, it also has staying power beyond Halloween! Plus this is so easy to make. You only need a few items and a knife, it takes less than 10 mins to pull this all together, so you can do one or go for a batch!
Painting Your Skull Planter
If you want to go that extra step, and have fun while doing it, you can paint your skull. It adds a lovely pop of color and customizes your skulls. Greta fun for the entire tribe!
Styrofoam is a great material to use for crafts, as it’s super lightweight and comes in many shapes and sizes. The best paint to use on styrofoam is acrylic paint as it adheres to the styrofoam well. Since styrofoam is so porous, you’ll likely need to use several coats of paint to cover it. Use a foam brush to apply the paint and wait for the coat to dry before adding additional ones.
Succulents
These plants, which store water in the stems and leaves, are popular for growing indoors because of their various advantages.
Unlike most plants, succulents do not release carbon dioxide at night. Instead, they continue to produce oxygen. This continuous burst of oxygen freshens the air in your house and improves your breathing – assuming, of course, you aren’t allergic to the plants. It’s a good idea to position plants in rooms where you feel you need an extra breath of fresh air, such as the bathrooms or even your kitchen.
NASA research suggests that succulents can remove many volatile organic compounds from the air. Plants emit water vapor, and that in turn generates a pumping action that pulls contaminated air down to the roots of the plant. The succulent converts these contaminates to plant food, thereby purifying the air of your home.
Tips For Your Skull Planter
- Make sure to use a sharp knife for cutting your Styrofoam, and obviously handle with care!
- You can buy a pre decorated skull, if you don;t want to paint it.
- Add duct tape to the inside of the planter hole, this is important so the Styrofoam doesn’t get wet when watering.
- Fertilize your succulents at least once a year and water then weekly.
Check Out These Other Great Halloween Ideas
Our Favorite Halloween Decor and Entertaining Items
A Charming and Vintage Halloween Party
The Perfect Halloween Candy Cart
How To Make The Perfect Halloween Meat and Cheese Board
If you have made this skull planter, or any other project on my blog, then please rate it and let me know how it turned out in the comments below!
You can also FOLLOW ME on FACEBOOK, INSTAGRAM and PINTEREST to see more delicious, healthy, family friendly food!

Easy Skull Vase
Ingredients
- 1 styrofoam skeleton head, this one came pre-decorated at the LA flower mart, but most craft stores have something similar and in different sizes
- succulents
- planting dirt
- handful of moss
Instructions
- Cut a hole in the top of the styrofoam skeleton in the shape of a square.
- Use that piece (that you just removeto fit into the bottom of the skeleton if there is an opening. You might need to cut it to adjust.
- Fill the bottom with a handful of moss, make it come out of the eyes and nose.
- Use duct tape to tape around the edges of the hole, so the styrofoam doesn’t get too wet when watering the plants.
- Add in the dirt and plants.
- Sprinkle with water every few days and enjoy!


where did you find the skulls that were used to make the planters?
OMG, this is amazing! I have to do this. I’m going to explore in the woods today and see if I can’t find an animal skull.
oh awesome! this brought a smile to my face!