
This post may contain affiliate links. Please see our disclosure policy.
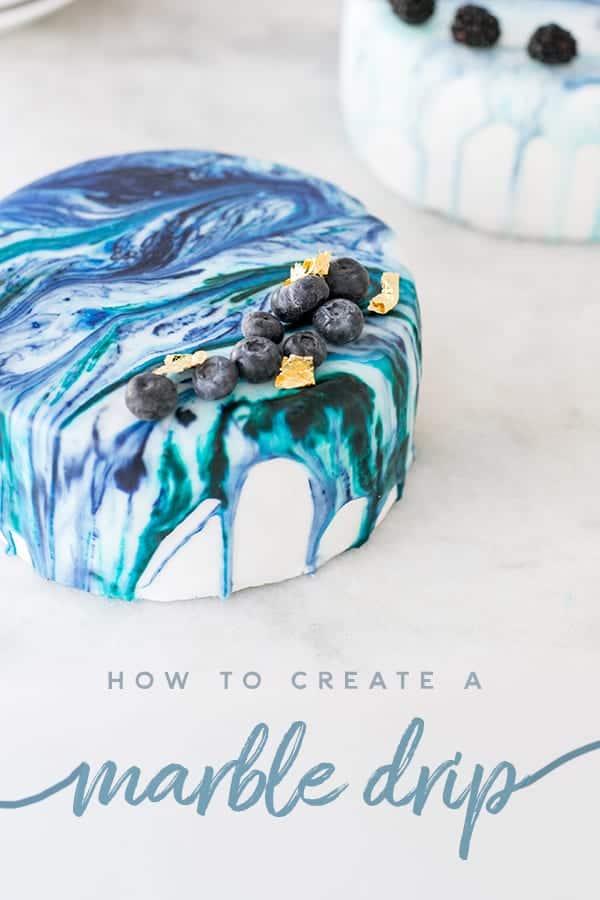
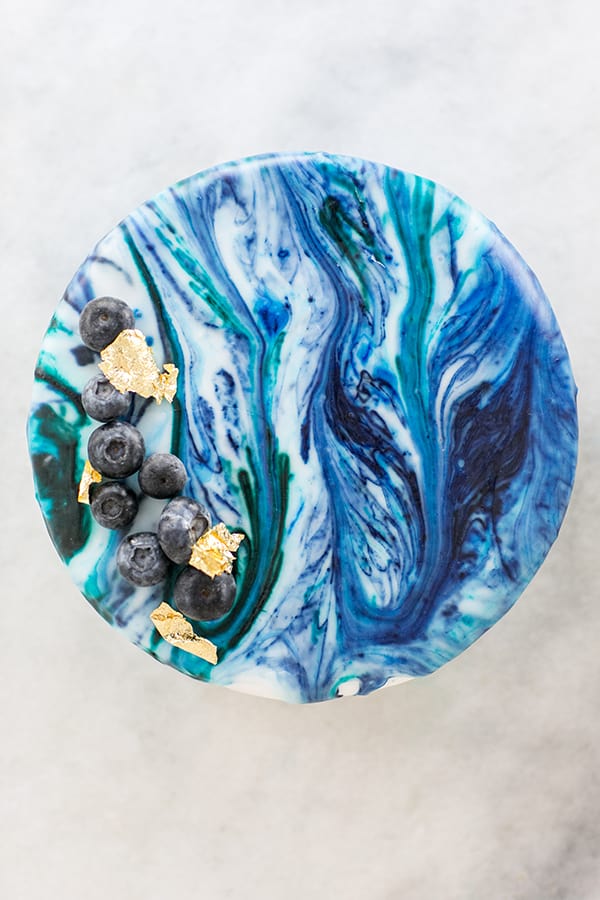
If you are looking for a fun and pretty way to decorate a cake for a party, this marble drip cake is for you! Follow this decorating tutorial for and easy drip cake with a marble effect, and you’ll have a stunning cake in a matter of minutes! Also check out my marble candy apples!
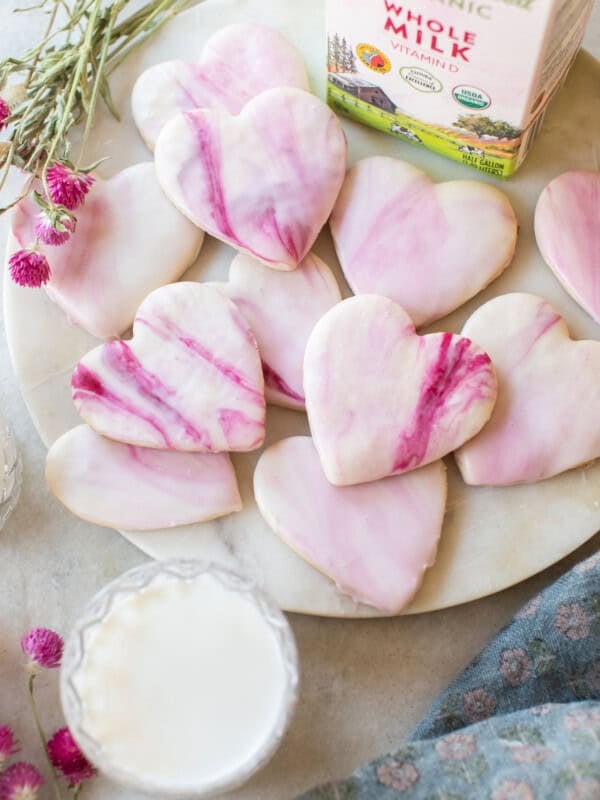
Pin this now to find it later
Pin ItWe’re sharing a deliciously easy way to create a marble drip cake! Drip cakes can be so intimidating to make, but to be honest, they’re actually a fairly simple way to frost a cake!
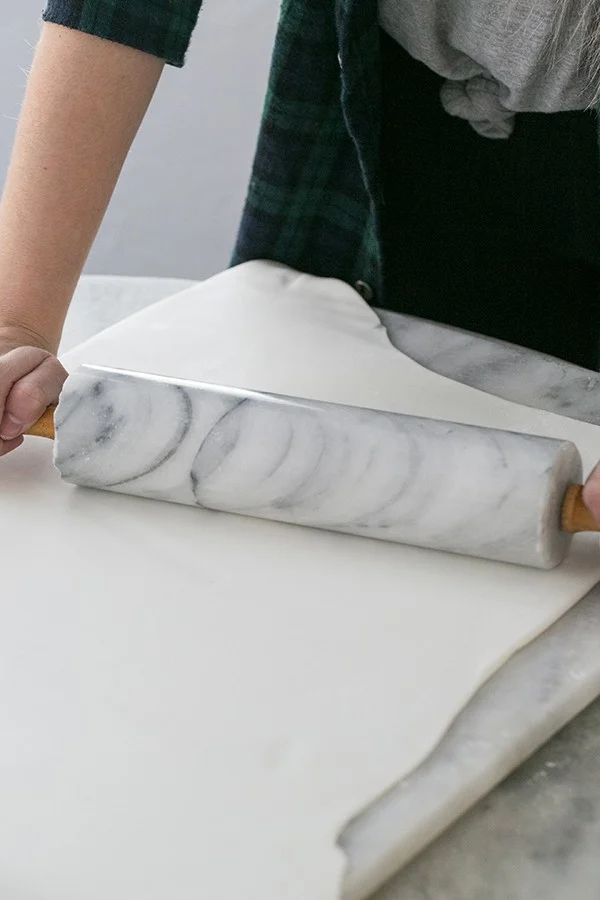
As long as you’re comfortable using fondant to cover the cake, the frosting part is easy peasy! Fondant isn’t difficult either, it just takes some strength and time to roll it out!
We used a simple icing recipe and added a little corn syrup to keep some of the shine.
Marble Drip Cake
Fondant – Homemade or store-bought. You can try our marshmallow fondant recipe too!
Rolling Pin – Used to roll out the fondant.
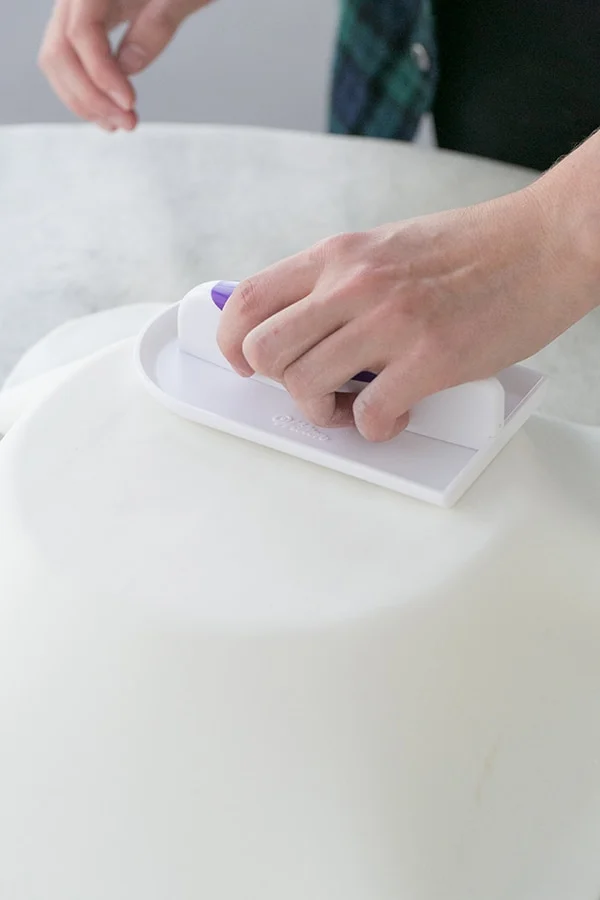
Fondant Smoother – To get a smooth texture.
Baking Sheet and Cookie Rack – Used to place the cake so the icing can drip down and not create a mess.
Measuring Cup with Spout – To pour the icing over the cake.

How to Make
Bake one of our easy homemade cake recipes. We love this easy vanilla cupcake recipe, and this is our favorite chocolate cake. We also love our funfetti cake too!
Bake the cake in a standard 8″ round cake pan. Lightly frost the cakes before adding the fondant.
Knead and roll out the fondant to about 1/4 inch thick. Then place it over a lightly frosted cake.
The reason you frost the cake is so the fondant will stick to it and hold. Frost all the way down the sides, top, etc.
Place the fondant on top and then smooth it out using the fondant smoother. This will remove any bumps, it doesn’t have to be perfect!
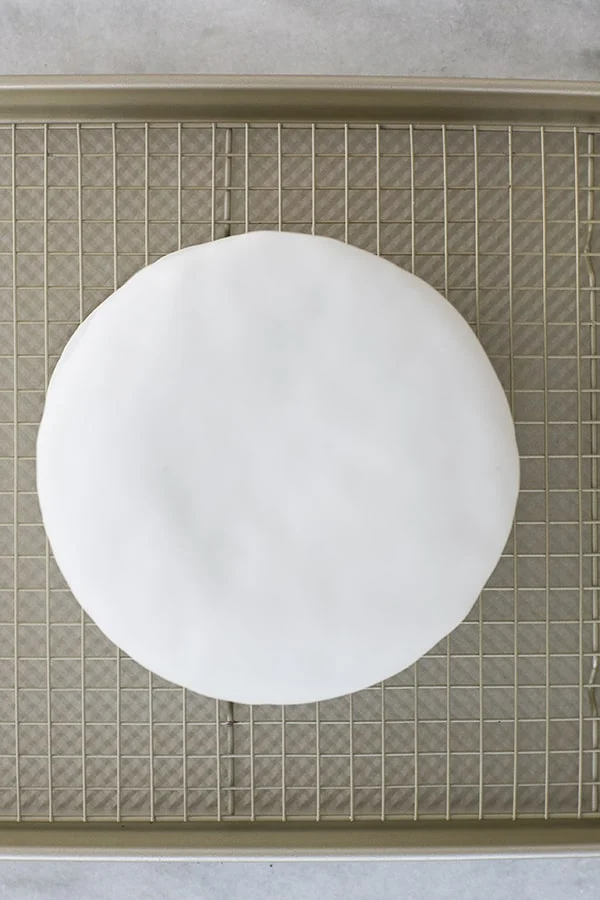
If you need, store these cakes in the refrigerator for one day.
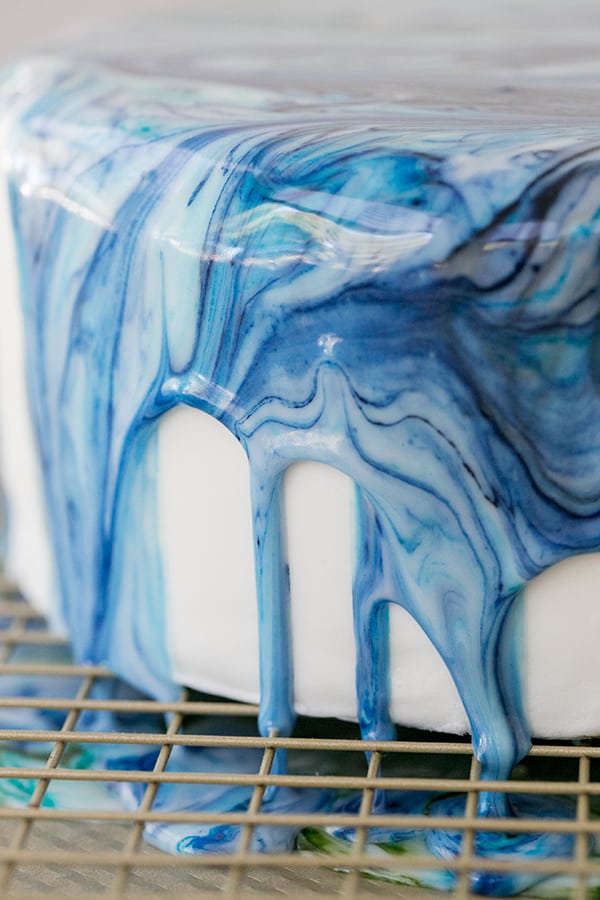
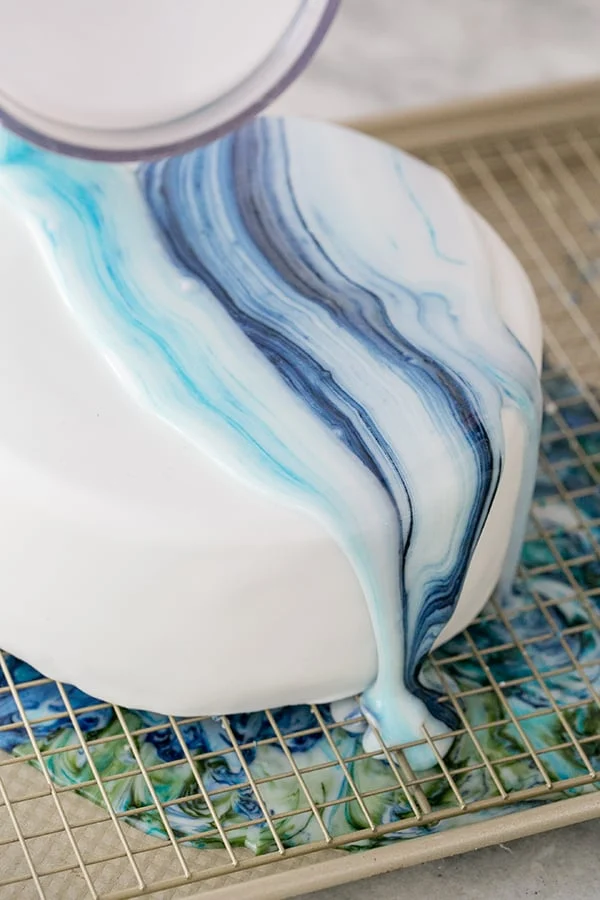
Place a rack on a rimmed cookie sheet and place the cake on top. This way the frosting will fall beneath.
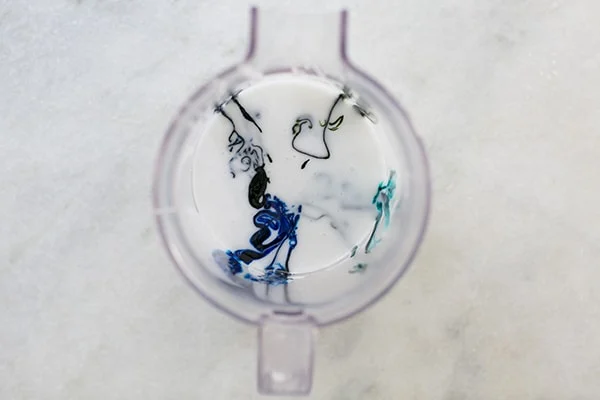

Make the frosting (recipe below) and add drops of desired food coloring. We used food coloring gel for this recipe.
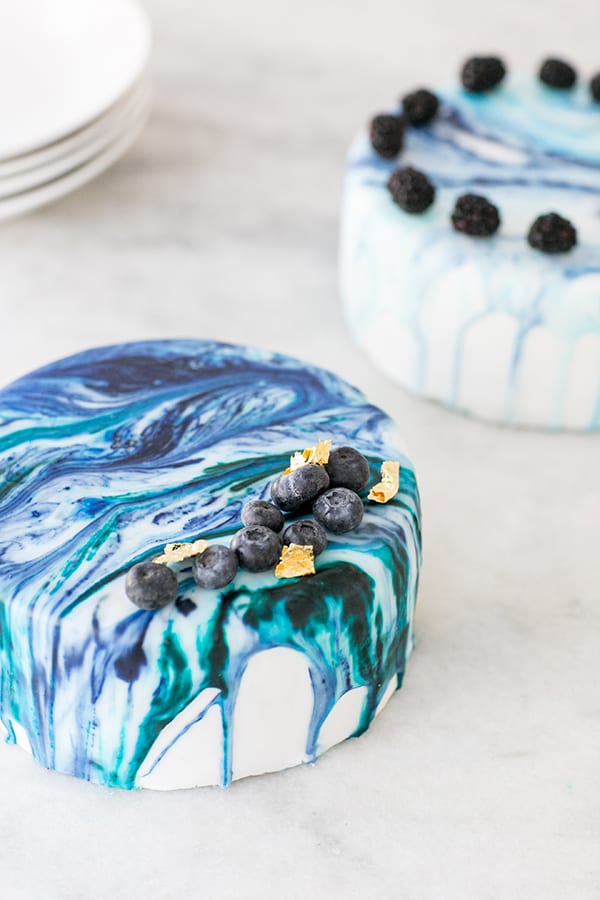
Don’t stir it, it will marble as you pour. Since we love blue so much, we did different shades of it to create our marble effect. You can use any color to make this cake!
Pour the icing over the top of the cake and watch it drip down the sides. It’s awesome to see the colors blend together and make such stunning patterns!
In about 30 minutes, your marble drip cake will harden and keep its shape!
Tips for Decorating
- Make sure your cake has cooled to a warm temperature before decorating.
- Once the cake is covered in fondant, you can let it cool in the refrigerator for 30 minutes if needed.
- Remember to place the cake on a rack over a cookie tray before pouring the icing over it. This will ensure you don’t end up in a mess!
- Finish decorating the cake with fresh fruit or edible flowers.
- For the marbling, try to stick to different shades of the same color. It will give the marble drip cake a marble look.
- To make it even easier, call your local bakery and order an 8″ round cake covered in white fondant. Then all you need to do is add the icing.

More Recipes You’ll Love!
Looking for more? Here are some of our top cake recipes!
- Neapolitan Sheet Cake
- The Best Coconut Loaf
- Ice Cream Sundae Cake
- Chocolate Zucchini Cake
- Classic Banana Cake Recipe
- The Best Banana Bread
- Lavender Cake
- Buttermilk Cake Recipe
- Orange Chocolate Cake
Now that you know how to make the most amazing marble drip cake, show us your pictures! Please tag us on social and leave a comment below!
You can also FOLLOW US on FACEBOOK, INSTAGRAM, and PINTEREST to see more delicious recipes, cocktails, desserts, and parties!
My new Entertaining book is here! Order Now!

Marble Drip Icing
Ingredients
- 3 cups powdered sugar
- 1 tbsp corn syrup
- 1/4 cup warm water
- 1/2 tsp almond extract
- food coloring, gel or drops
Instructions
- Cover a round cake in fondant.
- Add all of the ingredients, except the food coloring, in a bowl and whisk until smooth.
- Add in drops of food coloring, or use a wooden popsicle stick to add drops of gel food coloring to the icing. Do not mix it. It will give it’s own marbling effect when it’s poured.
- Place the fondant cake on a cooling rack with a cookie sheet underneath.
- Pour the icing over the top and let it dry.
Notes
Nutrition
Nutrition information is automatically calculated, so should only be used as an approximation.


Hi I was wondering what is the experience with using this method on a wedding that will be stacked. My bride wants the marble look but no fondant. Does this stiffen into a regular buttercream or does it stay liquid/sticky?
Hi Kelli – I would recommend trying this first. To be honest, we’ve never done it on buttercream so I can’t say if it will work or not. There might be some comments from others you have, you can read through and see. I’m sure it would be fine stacked with fondant.
I had to add WAY more water than the 1/4 cup to get it runny enough to pour!
Super excited to try this! Has anyone tried it without corn syrup (which doesn’t seem to be available in the UK?) I suppose it won’t be as shiny, which isn’t the end of the world, but I’m wondering whether it will create issues with consistency and pouring.
Living in IRE here and the syrip isnt popular here either try mix the cornstarch with the cold water; place in a saucepan and bring to a boil, stirring while cooking. When it becomes clear, add the sugar. Boil down until it is the thickness of prepared corn syrup. It will thicken some as it cools
Same in Australia – here it is called glucose syrup, which may be similar to the UK??
I used Lyle’s syrup instead of corn syrup and it worked so well!
Oh!! Great to know, thank you!!
Is it okay to use homemade marshmallow fondant?
We haven’t tried it with homemade marshmallow fondant but I think it could work. Just make sure to put the covered fondant cake in the refrigerator before so it’s cold too.
I’ve always loved the look of this kind of cake! I can’t believe how simple you make it seem. I’m excited to try this for EASTER. So pretty with springtime colors and some candy eggs (I have some gorgeous ones from Williams Sonoma!). Thank you. I LOVE your website!
Wow, your cakes are stunning! I’m glad other readers have shared tips for pouring it over buttercream. We aren’t big fans of fondant, so I am going to try that method.
This cake is gorgeous! I’ve always wanted to make one of these and I love your how to!
I just did it on buttercream and it did melt it. had the cake in fridge for 2 hours prior.
ugh- did NOT melt it. typo sorry- was just so excited it worked! lol
So it did work for you?! It’s the coolest cake!!
What method did you use for buttercream to not melt the butter?
Can someone clarify ‘pouring’ to get the swirling river look please. Did you start at one side & pour in a zig zag across the cake?
Hi! Is the almond extract onlyfor taste or does it have another purpose?
For taste 🙂