
This post may contain affiliate links. Please see our disclosure policy.
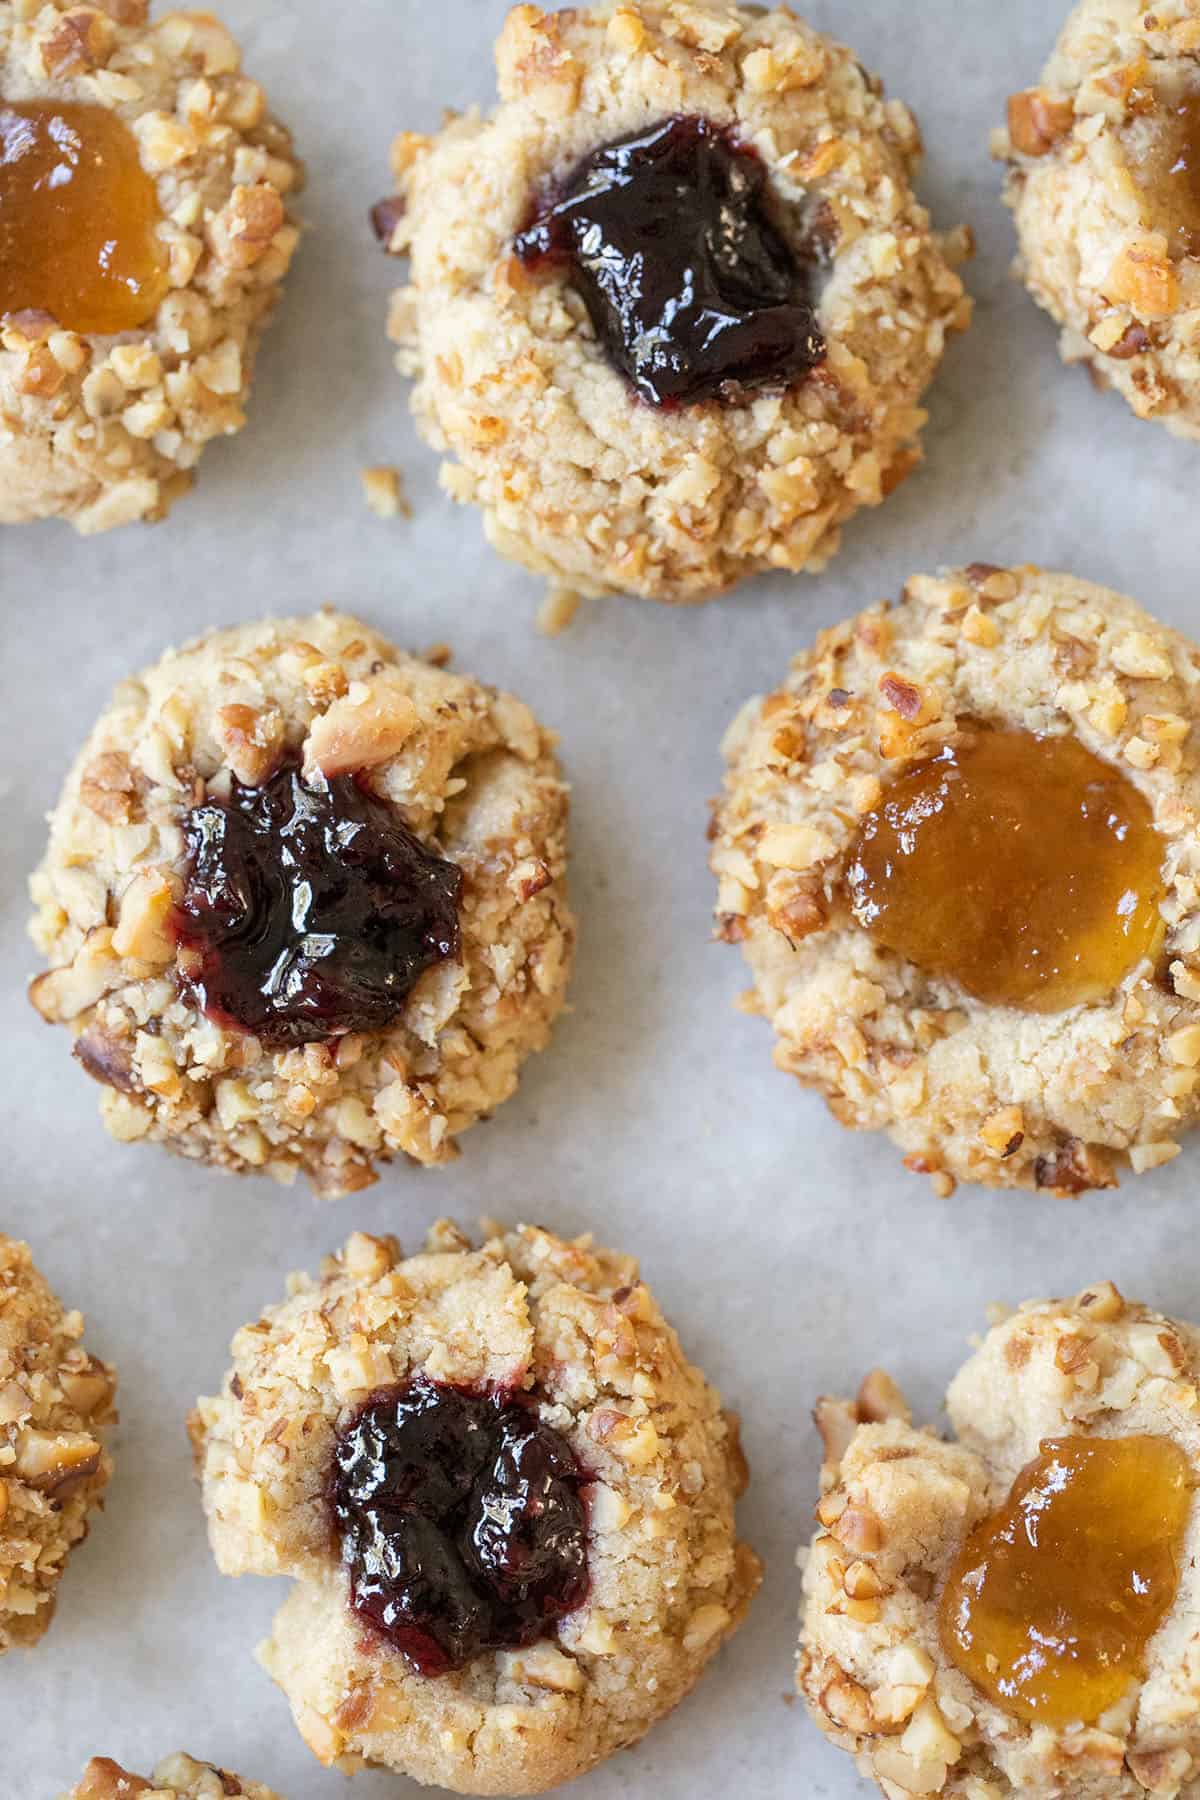
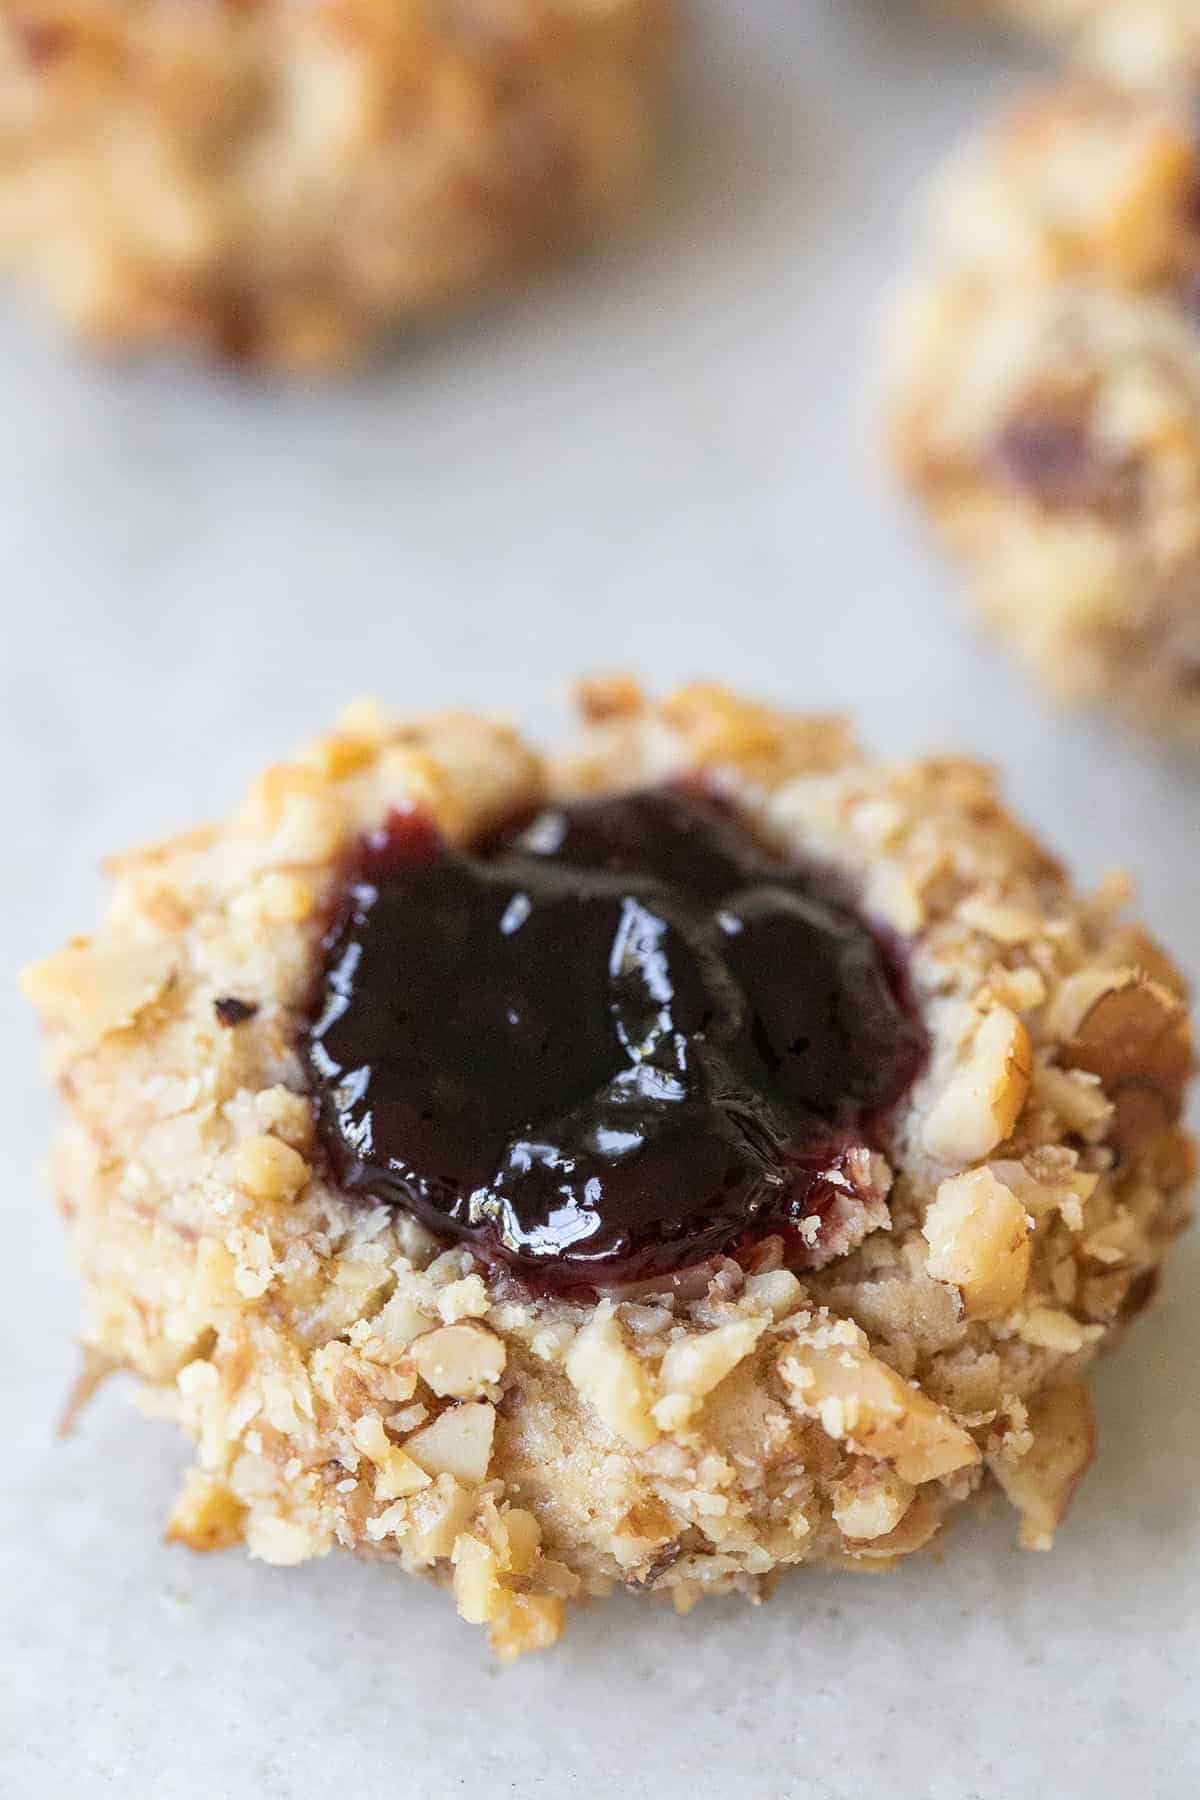
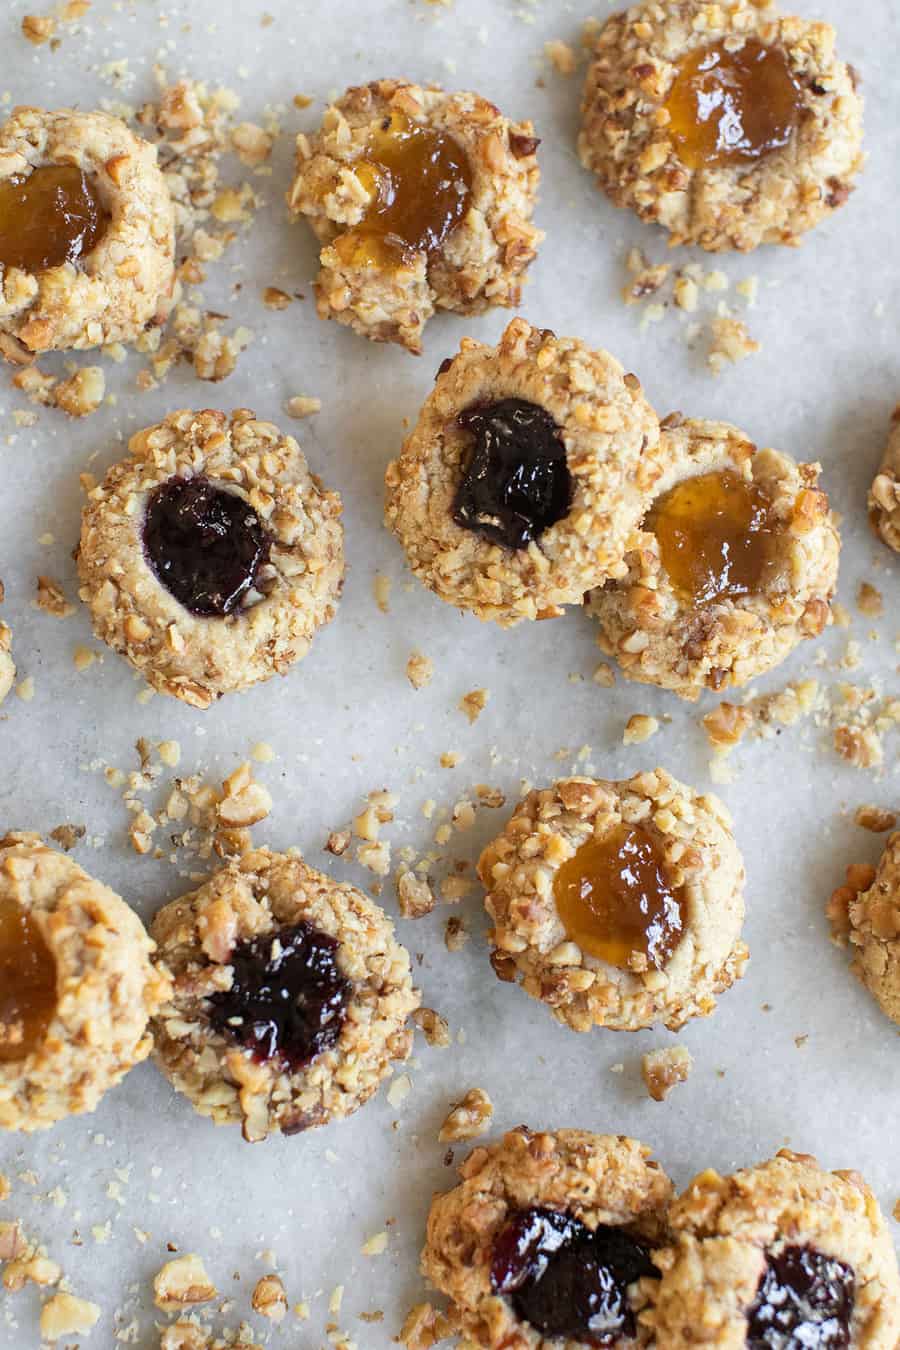
These classic thumbprint cookies are made with a buttery shortbread-style dough, rolled in finely chopped walnuts, and filled with sweet jam. The recipe comes from my mother-in-law, who has made these cookies for over 40 years, and it’s the one I bake every Christmas without fail. Just six simple ingredients, and they hold their shape beautifully every time.
If you love jam-filled treats, you’ll also love my shortbread cookie bars, my classic Italian rainbow cookies, and my cherry pie bars!
Pin this now to find it later
Pin It⭐⭐⭐⭐⭐
“I lost my mother’s recipe for thumbprint cookies and was about to give up being able to make them for Christmas, but then found your recipe, and it is exactly like hers.” Sharon
Here’s What You Need to Know
This is a true shortbread-style dough, so there’s no leavening and no chill time required. The cookies bake twice: once to set the dough, then again for 5 minutes after you fill them with jam. That second bake is what keeps the jam glossy and neatly set in the center.
A few quick things before you start. Use thicker jams like seedless raspberry, apricot, or strawberry, since runny jam can leak during baking. Roll each dough ball smooth before pressing the center, and if your kitchen is warm, chill the dough for 15 to 30 minutes so the cookies hold their shape. These are the same cookies that show up on our holiday table every year, right alongside my gingerbread cookies and chocolate crinkle cookies. They’re reliable, nostalgic, and always the first to disappear.
Thumbprint Cookies Ingredients
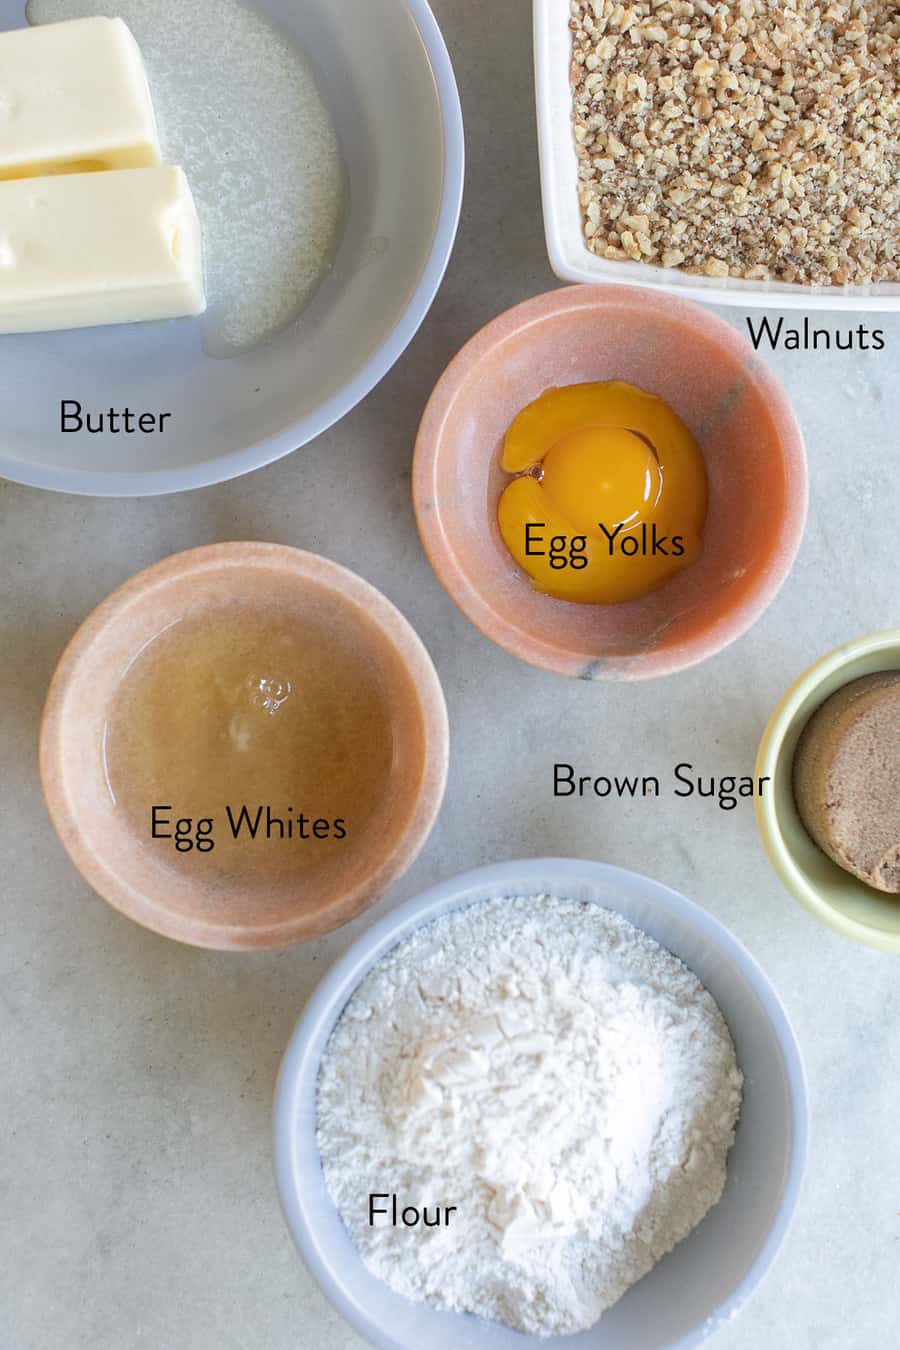
Butter: Unsalted, room temperature. This gives the cookies their classic shortbread texture, with the same buttery richness as my brown butter chocolate chip cookies.
Dark brown sugar: Adds a subtle caramel flavor that pairs perfectly with jam.
Eggs: Yolks enrich the dough, and the whites help the walnuts stick.
All-purpose flour: I use King Arthur for consistent results, just like in my snickerdoodle recipe.
Walnuts: Finely chopped for an even coating and light crunch. If you’re a walnut lover, my chocolate chip walnut cookies are calling your name.
Jam: Raspberry, apricot, or strawberry work best. Thicker jams bake up cleaner, the same kind I shake into my gin and jam cocktail.
How to Make Thumbprint Cookies

Prep: Preheat the oven to 375°F. Separate the egg yolks and whites, and whisk the flour to remove lumps.
Cream: Beat the butter and dark brown sugar until smooth and fluffy.
Make the dough: Mix in the egg yolks, then the flour just until combined.
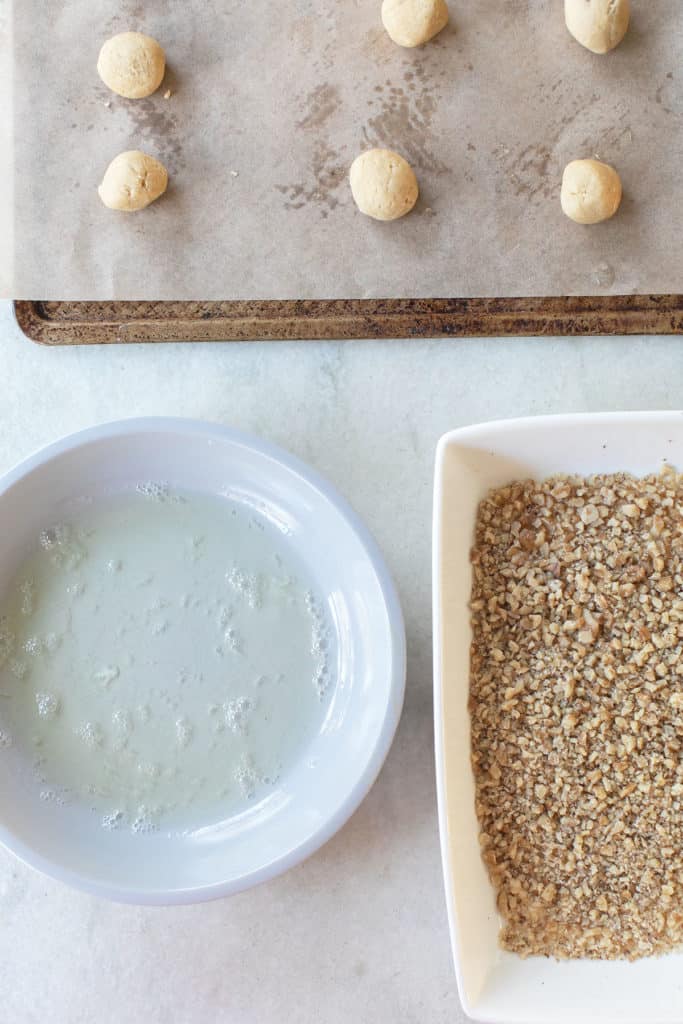
Prep the walnuts: Finely chop them in a food processor and pour onto a shallow plate.
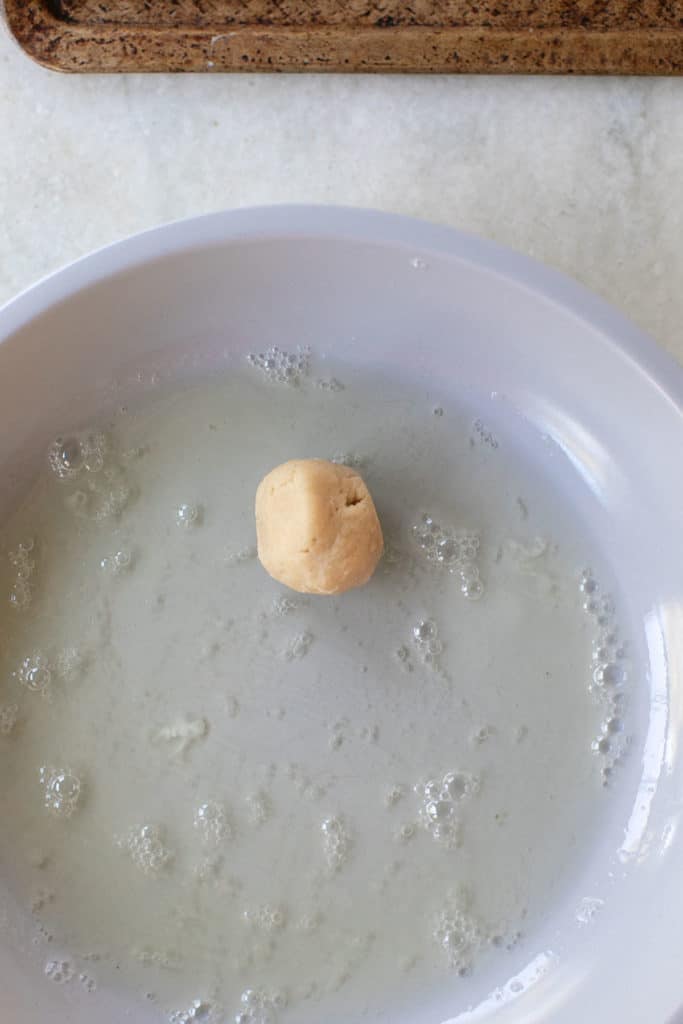
Roll: Scoop the dough into balls and roll each one smooth between your palms. Smooth balls mean no cracks when you press the centers.
Coat: Roll the balls in egg whites, then in the chopped walnuts.
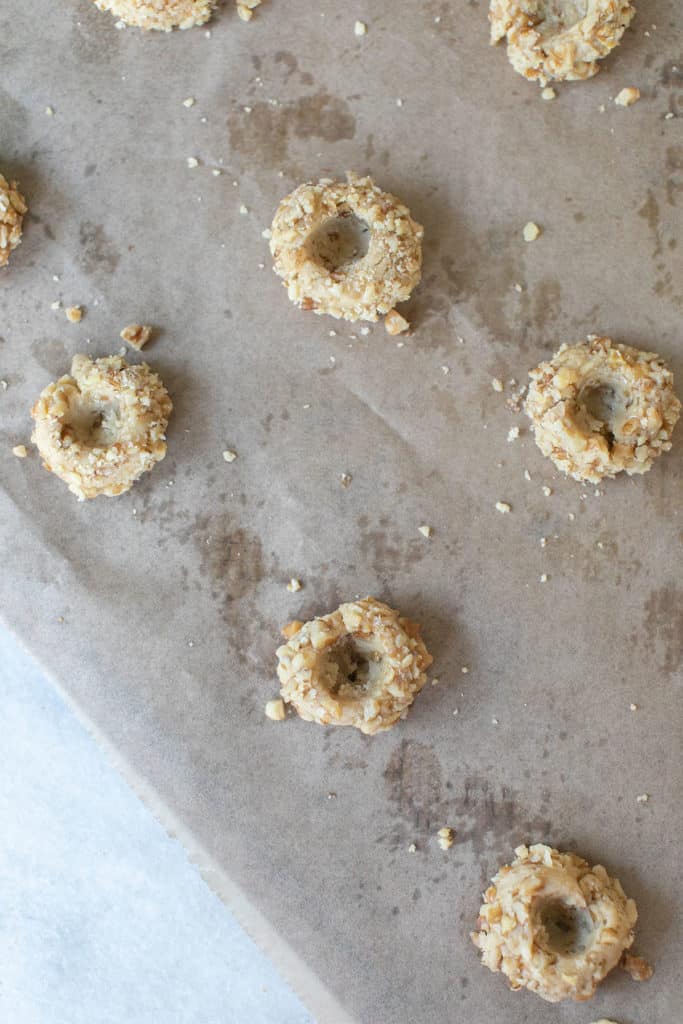
Indent: Press a deep well in the center of each ball using a small round teaspoon.
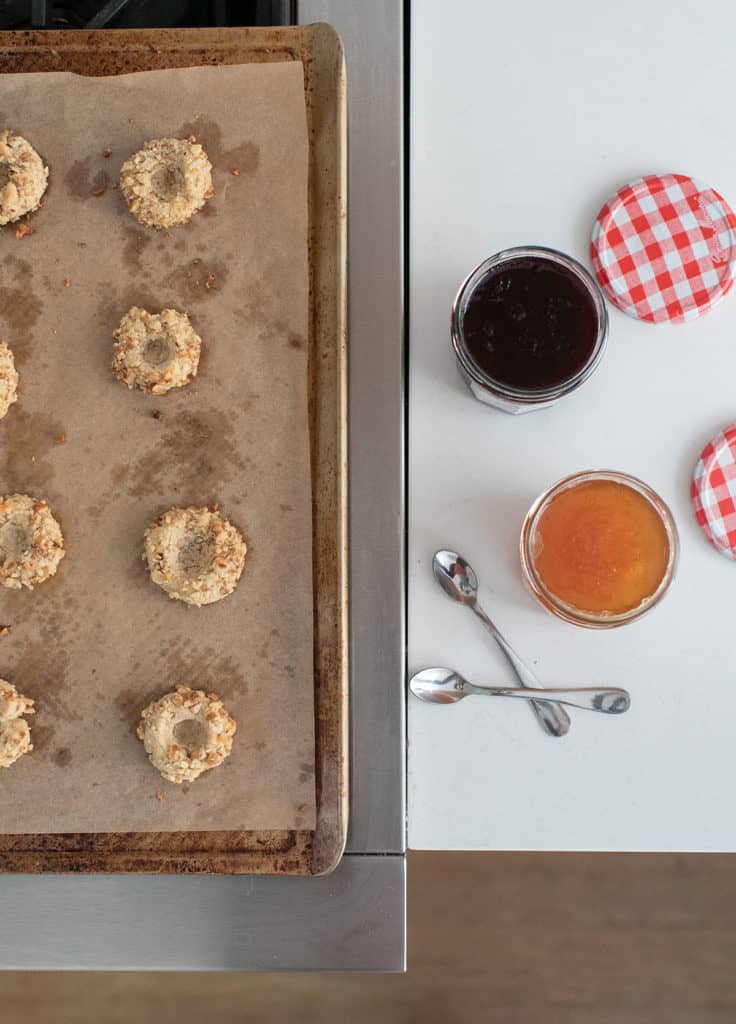
Bake: Bake at 375°F for 10 to 12 minutes.
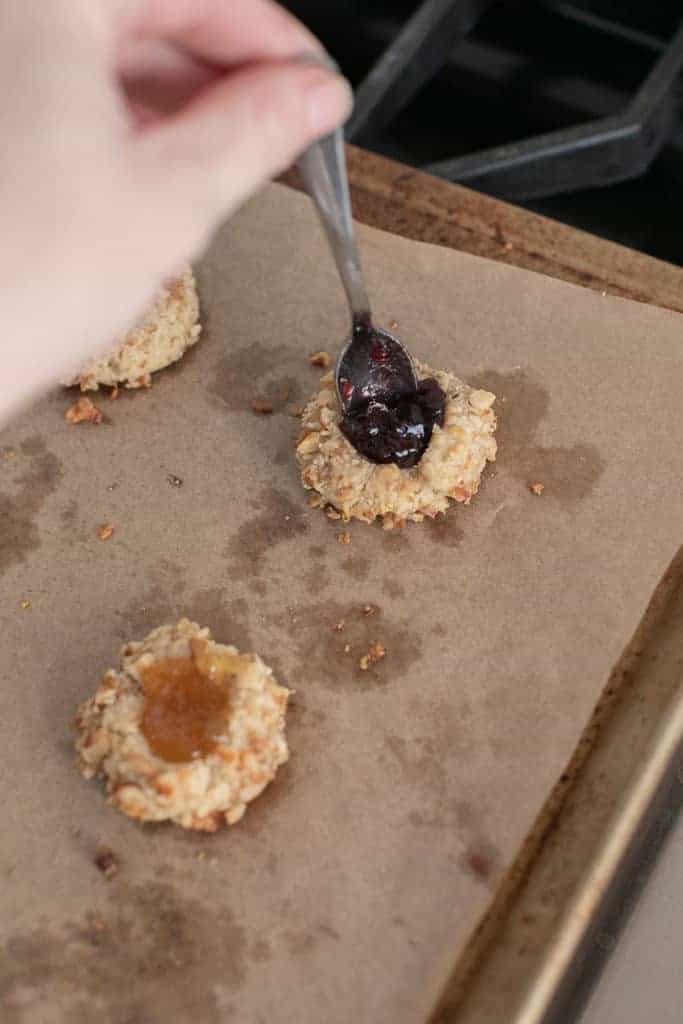
Fill and finish: Spoon about ½ teaspoon of jam into each center, then bake for 5 more minutes.
Cool: Transfer to a wire rack and cool completely so the jam sets.
Cookie Tips
Roll the dough balls smooth. Cracks around the edges happen when the ball has seams or the dough is too cold. Roll each one until smooth, and press the center right after rolling while the dough is soft.
Refrigerate the dough if soft. If your kitchen is warm or the dough feels sticky, chill it for 15 to 30 minutes. It’s the same trick I use for my snickerdoodle cookies to keep them from spreading.
Use room-temperature butter. Softened butter creates a smoother, more cohesive dough.
Avoid over-mixing. Overmixing makes shortbread-style cookies dense instead of tender. This matters just as much in my rosemary shortbread cookies.
Shape with a small spoon. A small round teaspoon makes evenly shaped wells and prevents sticking, the same trick I use for my chocolate crinkle cookies.
Fill with a light hand. About ½ teaspoon of jam per cookie is perfect. Overfilled wells bubble over during the second bake.
Recipe Variations
- Chocolate Thumbprint Cookies: Fill with melted chocolate or chocolate hazelnut spread. Perfect alongside my chocolate cherry chunk cookies.
- Nut-Free Thumbprint Cookies: Skip the walnuts and roll in sugar instead. Great with my spritz cookies!
- Holiday Thumbprints: Use festive sprinkles instead of nuts for a Christmas cookie tray with my gingersnap cookies and cut out sugar cookies.
- Citrus Jam Thumbprints: Use apricot jam or marmalade and serve with my lemon loaf cake or orange ricotta cake.
Storing and Freezing
Store cooled cookies in an airtight container at room temperature for up to 3 days, or in the fridge for up to a week.
To freeze, you have two options. Freeze the baked cookies in a single layer, then transfer to a freezer bag for up to 3 months. Or freeze the unbaked, walnut-coated dough balls and bake straight from frozen, adding a minute or two to the first bake. I love having a batch of dough balls tucked away for surprise guests during the holidays.
Thumbprint Cookies FAQs
Cracking happens when the dough balls have seams or the dough is too cold. Roll each ball completely smooth, press the center right after rolling, and if cracks appear, just pinch them back together. The walnut coating hides small imperfections beautifully.
This usually means the butter was too soft or the dough was overmixed. Chill the dough for 15 to 30 minutes before rolling and they’ll hold their shape.
This recipe is designed for a mid-bake fill: bake 10 to 12 minutes, add the jam, then bake 5 more. It keeps the jam glossy and set without burning. If you prefer, you can bake the cookies fully and add jam just before serving for a brighter, fresher jam flavor. Both work, they’re just different looks.
Yes! Fold the chopped walnuts right into the dough. If you do this, skip the egg whites entirely, since they’re only there to help the coating stick.
Thumbprint cookies are classic shortbread-style cookies with a well pressed in the center, traditionally filled with jam or preserves. They’re believed to have originated in Sweden, where they’re called hallongrottor, which sweetly translates to “raspberry caves.”
Thicker jams like seedless raspberry, apricot, or strawberry bake up the cleanest. Runny jams can leak over the sides during baking.
More Cookie Recipes

Cookies & Brownies
Brown Butter Chocolate Chip Cookies
Cookies & Brownies
Chocolate Chip Cookies Without Butter (Soft & Chewy!)

Recipes
Kitchen Sink Cookies Recipe
And for serving, arrange them all on my dessert charcuterie board for the prettiest holiday spread.
Thumbprint cookies are one of my favorite easy, classic treats, and they’re endlessly customizable depending on the season or what jam I have on hand.
If you make them, please leave a comment and a 5-star rating below. It truly helps other readers find the recipe, and after 40 years of family baking, this recipe has earned its stars!

My new Entertaining book is here! Order Now!

Thumbprint Cookies
Ingredients
- 2 cups all-purpose flour
- 2 large eggs, seperate the egg yolks and whites
- 1 cup butter, 2 sticks, salted or unsalted
- 1/2 cup dark brown sugar
- 1 cup walnuts, finely chopped
- 12 ounces preserves, any flavor you want!
Instructions
- Preheat and prep – Preheat the oven to 375°F and line a baking sheet with parchment. Separate the egg yolks and whites, and quickly whisk the flour to remove lumps. Measure the brown sugar by packing the measuring cup.
- Mix – Cream the butter and brown sugar together. Add in the egg yolks and flour and mix on medium until fully combined.
- Crush the walnuts – In a food processor or blender, pulse the walnuts until finely chopped. Pour them into a shallow plate or bowl.
- Roll the dough – Use a melon baller to scoop the dough and hand roll it into smooth balls. Smooth balls prevent cracking when you press the centers.
- Coat the cookies – Roll the balls in egg whites and then the chopped walnuts to cover the entire ball.
- Prepare for baking – Place 12 cookies on the lined baking sheet and press down in the middle using a small round measuring teaspoon to make a "thumbprint."
- Bake first time – Bake for 10 to 12 minutes. You will bake again after they are filled.
- Fill the cookies with jam – Spoon about ½ teaspoon of jam into each thumbprint, just until filled.
- Then bake again – Place them back in the oven and bake again for 5 minutes.
- Bake again – Return to the oven for 5 more minutes. Cool completely on a wire rack so the jam sets.
Notes
- Room temperature: 3 days in an airtight container
- Refrigerator: Up to 1 week
-
Freezer:
Freeze baked cookies or unbaked dough balls up to 3 months
Nutrition
Nutrition information is automatically calculated, so should only be used as an approximation.


Did the recipe as written, but added 1 tsp vanilla and 1/2tsp salt. Came out great! didn’t run, very nice…gift for neighbors
I lost my mother’s recipe for thumbprint cookies and was about to give up being able to make them for Christmas, but then found your recipe – and it is exactly like hers. Only difference is we cook the cookies completely then add the jelly (red currant jelly for christmas) just before serving. I will try both ways and see which the family likes better.
Thank you!
This makes me so happy! Thank you for sharing and I can’t wait to hear what your family thinks 🙂
Instead of rolling them IN the nuts, can I add the nuts to the batter? If I can, do I use the entire egg?
You can do that and you won’t need the egg white, just the yolk.
Just finished the first batch and what a fantastic recipe!!! SOOO easy and brilliantly delicious, this one is going in my “tried & true” recipe list. Thank you!
These thumbprint cookies are awesome! Very easy to make a variety of flavors with different jams and jellies. So yummy!
We love these! The nuts are a great addition!
Do you think you could freeze these. Maybe do the first bake, then freeze. When ready to eat, take out for 15 mins or so, fill and bake for the last 5 minutes?
You can probably freeze them and let them sit to room temp. They are best fresh though, they’re SO good!
These cookies look super amazing!
Thank you Allyson!!
These look like something I’d love. Can’t wait to try it!
Thank you Katie 🙂
These look like the perfect afternoon treat to make with my kids today. I’ll let the kids pick out and fill the jam. Can’t wait!
Yay! Thank you Jen!!