
This post may contain affiliate links. Please see our disclosure policy.
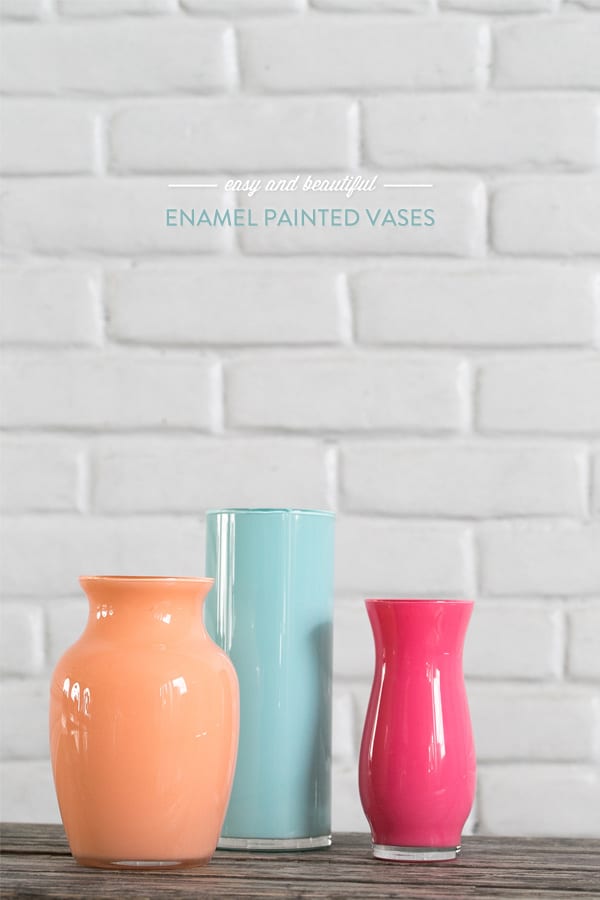
Cost-friendly DIY for beautiful enamel-painted vases. These are easy to make and look chic on a shelf or for birthday parties or events!
Pin this now to find it later
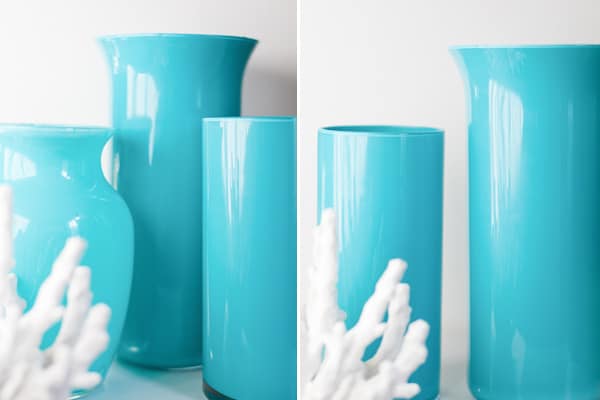
Pin ItEnamel-painted vases – I’m in love! If you like to paint, I have a really fun project to share today! My inspiration for these easy DIY enamel-painted vases came from a restaurant in Sonoma called El Dorado Kitchen.
I’ve always loved the fresh, modern design of the lobby and the eye-catching green and white enamel-painted vases that are displayed on white shelves.
I decided to make my cost-friendly version of this design, which included a quick Martha Stewart tutorial and a trip to the Dollar Store, where I picked up these three vases.
What You’ll Need
– Three different-sized vases from the Dollar Store
– Dishwasher-safe PermEnamel paint in Mediterranean Blue and White (or whatever color you prefer)
– PermEnamel Surface Conditioner from Michaels Arts and Crafts store
DIY Painted Vases – Steps To Follow
1 — Clean the vases with hot, soapy water.
2 — When they are completely dry, pour some surface conditioner in and cover the inside of the vase. Pour out the excess and let the vase dry.
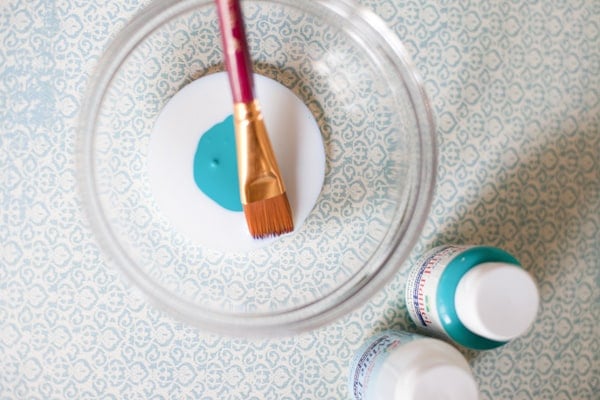
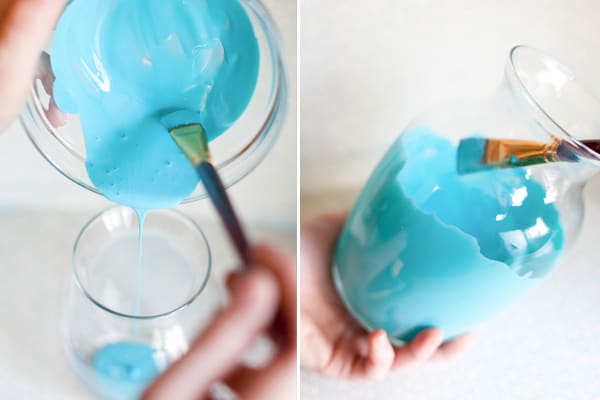
3 — Get the exact color you envision by mixing your PermEnamel paints in a mixing bowl, then pour them inside the vase.
4 — Paint the inside of the glass using a paintbrush to cover the inside surface.
5 — Once the vase is painted, lay it on a paper towel to let the thick paint drip off. You will be amazed at how much comes out! The longer it’s upside down, the thinner the coating will be. I liked the thicker look, so I only kept it upside down only for a few minutes.
6 — Turn the vase back over and touch up the drips inside. Every fifteen minutes, you can even out the thickness on the bottom of the vase as the paint will start to collect.
7 — Let these dry overnight, and in the morning, you should have a beautiful decor vase!
Reminder and Notes
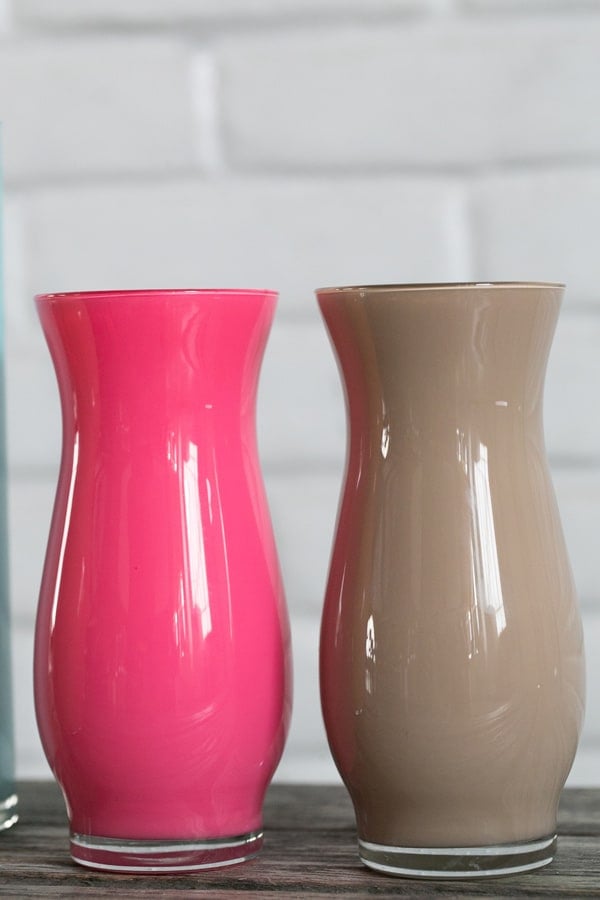
Remember, these beautiful enamel-painted vases are only for DECOR. Don’t drink out of them! You can put water in them, but it may damage the finish eventually.
I’m simply sitting them on the shelf, like the photos to the right.
Follow us for your daily dose of Sugar and Charm on Instagram!
More Creative Posts You’ll Love
- DIY Fabric Marbling
- Essential Oil Candles
- Green Apple Bath Bombs
- How to Arrange Cut Tulips in A Vase
- How to Make Cut Tulips Last
- Repurpose Yankee Candle Jars
Let us know if you make these easy enamel-painted vases! We’d love to know your thoughts!!

DIY Painted Vases
Ingredients
- Three different-sized vases from the Dollar Store
- Dishwasher-safe PermEnamel paint in Mediterranean Blue and White (or whatever color you prefer)
- PermEnamel Surface Conditioner from Michaels Arts and Crafts store
- Paper towels
- Paintbrush
- Mixing bowl
Instructions
- Clean the vases with hot, soapy water.
- When they are completely dry, pour some surface conditioner in and cover the inside of the vase. Pour out the excess and let the vase dry.
- Get the exact color you envision by mixing your PermEnamel paints in a mixing bowl, then pour inside the vase.
- Paint the inside of the glass using a paintbrush to cover the inside surface.
- Once the vase is painted, lay it on a paper towel to let the thick paint drip off. You will be amazed at how much comes out! The longer it’s upside down, the thinner the coating will be. I liked the thicker look so I only kept it upside down only for a few minutes.
- Turn the vase back over and touch up the drips inside. Every fifteen minutes you can even out the thickness on the bottom of the vase as the paint will start to collect.
- Let these dry overnight and in the morning you should have a beautiful decor vase!


Followed your directions exactly and it turned out great!! Thanks for the inspiration!
http://thehomesihavemade.blogspot.com/2012/01/it-all-started-with-mailboxesreally.html
this is a absolutelly great idea…going to the dollar store now. Thanks for posting!
Thank you everyone for the comments! This project was done over a year ago and I still receive comments on it, so thank you! Feel free to share with anyone as well 🙂 Also, if you have any question regarding paint colors, etc. email me 😉 THANKS!!!
I’m using this great idea to paint clear garage sale vases for a baby shower. I’ll be putting curly willow in the vases, possibly gluing a few pink butterflies and flower buds to the branches. Thanks for the great inspiration!!
Great idea! I have a bunch of these vases from flower deliveries! I love the color; turquoise is my favorite right now: )
Great idea! I’ve spray painted the outside of a vase before but I prefer the look of yours. Love the color too!
This project inspired me! I bought 20 vases from Goodwill for less than $1 each and set out to create a masterpiece. However, I thought the paint you have pictured was too expensive, so I decided to try a different paint from the craft store (Folk art) BIG MISTAKE! The paint cracked and sunk down the edges, and NOT in a cool way. Luckily it washed right out. I ended up spray painting mine instead, and since I finished them with a clear gloss, they ended up looking very shiny also. So those of you who decide to do this project, make sure you use the paint pictured!
I love this idea- I have a ton of empty jars. Im going to have to give this a try!
Those look beautiful! Thanks for sharing, you’ve got a new follower!
Question: can regular acrylic paint be used? I did get the surface conditioner, though. 🙂