
This post may contain affiliate links. Please see our disclosure policy.
Cost-friendly DIY for beautiful enamel-painted vases. These are easy to make and look chic on a shelf or for birthday parties or events!
Pin this now to find it later
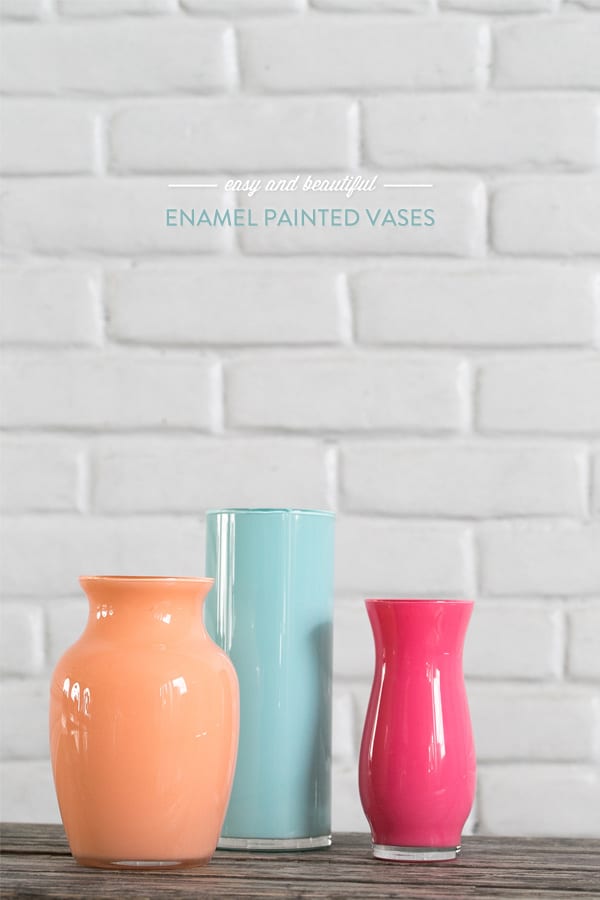
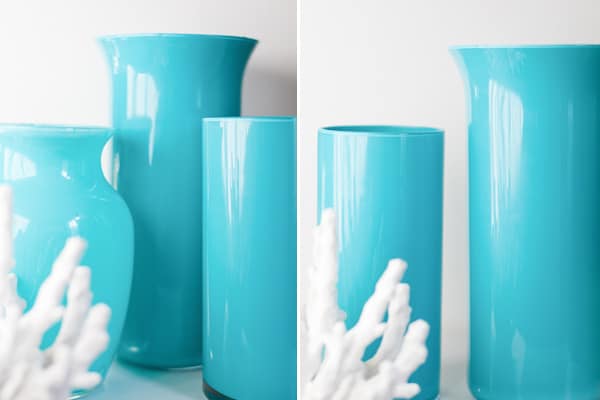
Pin ItEnamel-painted vases – I’m in love! If you like to paint, I have a really fun project to share today! My inspiration for these easy DIY enamel-painted vases came from a restaurant in Sonoma called El Dorado Kitchen.
I’ve always loved the fresh, modern design of the lobby and the eye-catching green and white enamel-painted vases that are displayed on white shelves.
I decided to make my cost-friendly version of this design, which included a quick Martha Stewart tutorial and a trip to the Dollar Store, where I picked up these three vases.
What You’ll Need
– Three different-sized vases from the Dollar Store
– Dishwasher-safe PermEnamel paint in Mediterranean Blue and White (or whatever color you prefer)
– PermEnamel Surface Conditioner from Michaels Arts and Crafts store
DIY Painted Vases – Steps To Follow
1 — Clean the vases with hot, soapy water.
2 — When they are completely dry, pour some surface conditioner in and cover the inside of the vase. Pour out the excess and let the vase dry.
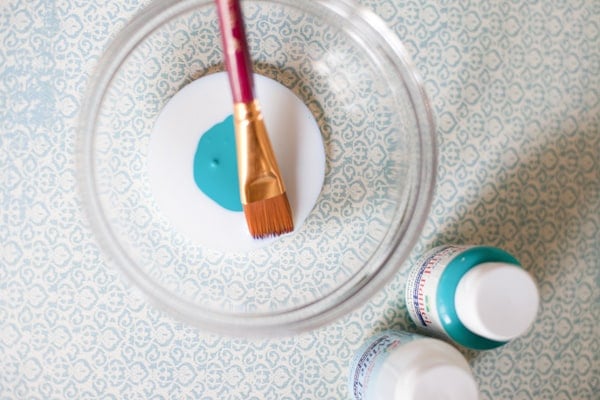
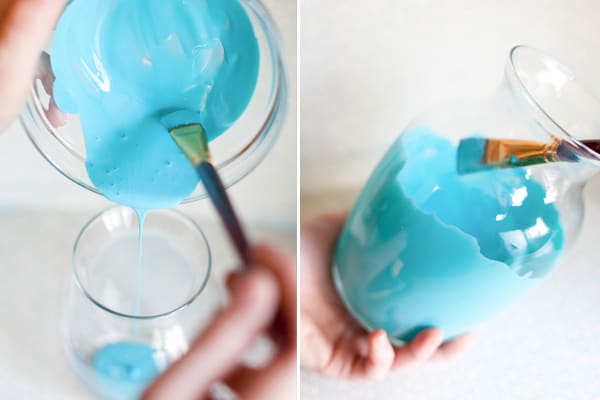
3 — Get the exact color you envision by mixing your PermEnamel paints in a mixing bowl, then pour them inside the vase.
4 — Paint the inside of the glass using a paintbrush to cover the inside surface.
5 — Once the vase is painted, lay it on a paper towel to let the thick paint drip off. You will be amazed at how much comes out! The longer it’s upside down, the thinner the coating will be. I liked the thicker look, so I only kept it upside down only for a few minutes.
6 — Turn the vase back over and touch up the drips inside. Every fifteen minutes, you can even out the thickness on the bottom of the vase as the paint will start to collect.
7 — Let these dry overnight, and in the morning, you should have a beautiful decor vase!
Reminder and Notes
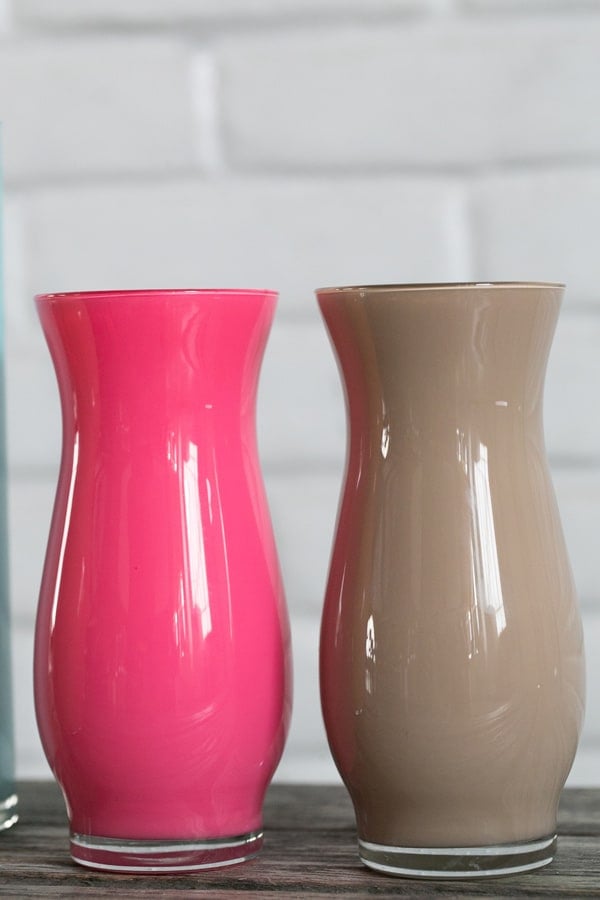
Remember, these beautiful enamel-painted vases are only for DECOR. Don’t drink out of them! You can put water in them, but it may damage the finish eventually.
I’m simply sitting them on the shelf, like the photos to the right.
Follow us for your daily dose of Sugar and Charm on Instagram!
More Creative Posts You’ll Love
- DIY Fabric Marbling
- Essential Oil Candles
- Green Apple Bath Bombs
- How to Arrange Cut Tulips in A Vase
- How to Make Cut Tulips Last
- Repurpose Yankee Candle Jars
Let us know if you make these easy enamel-painted vases! We’d love to know your thoughts!!

DIY Painted Vases
Ingredients
- Three different-sized vases from the Dollar Store
- Dishwasher-safe PermEnamel paint in Mediterranean Blue and White (or whatever color you prefer)
- PermEnamel Surface Conditioner from Michaels Arts and Crafts store
- Paper towels
- Paintbrush
- Mixing bowl
Instructions
- Clean the vases with hot, soapy water.
- When they are completely dry, pour some surface conditioner in and cover the inside of the vase. Pour out the excess and let the vase dry.
- Get the exact color you envision by mixing your PermEnamel paints in a mixing bowl, then pour inside the vase.
- Paint the inside of the glass using a paintbrush to cover the inside surface.
- Once the vase is painted, lay it on a paper towel to let the thick paint drip off. You will be amazed at how much comes out! The longer it’s upside down, the thinner the coating will be. I liked the thicker look so I only kept it upside down only for a few minutes.
- Turn the vase back over and touch up the drips inside. Every fifteen minutes you can even out the thickness on the bottom of the vase as the paint will start to collect.
- Let these dry overnight and in the morning you should have a beautiful decor vase!


I love it! I’m totally trying it if I can find those paints in here:P. Thanks for the aideas.
Wonderful idea. It can sometimes be very difficult to find vases in your specific color especially when it comes to wedding centerpieces. The paint seems to come out looking much more classy when you paint from the inside. I can’t wait to try this out on a couple of vases we had left over form our wedding centerpieces, finally a good use for all those vases! If anyones looking for some vases to purchase and paint you should check out http://www.dfwvases.com they have alot of the cylinder shapes that she has pictured above as well as the ginger jar shape. Works out great!
I JUST LOVE IT……………….
Would like to try these, looked for the paint enamel and cant find it. Can you tell me where you got your materials, thanks cheryl
I got everything from Miachael’s Arts and Crafts 🙂
Awesome! I want turquoise lamp bases in my living room. I now know how I’m going to get them! I’ll be on the hunt for clear glass lamps!
what is the frost paint used for? the outside of the paint looks so shiny and I wasn’t sure you got it to look that or if the paint in the glass just appeared that way.
I mixed the frost paint with the blue to lighten the color. It also gives it a nice shine 🙂
does it need to be enamel paint or can I use regular acrylic do you think? I don’t plan on filling them with water or anything, just for decoration…
If it’s just for decor, I think you can probably use an acrylic paint. I have not done that, but I think it would work 🙂
I did this project using Folk Art paint. I basically took the whole bottle (it was a large vase) and it rolled the vase around kind of in a swish motion. After I mostly had it covered I turned it upside down for several days to let the excess paint drip out. It checked it and changed the paper plate daily. It was beautiful! However once I put water in it the paint started to peel and float in the water. Such a big bummer since I spent to much time on it!
Can acrylic paint be used or does it have to be the enamel?? We only have Hobby Lobby here and did not have the ones that you used. Could not find the conditioner also, is it needed to finish it? Thank You
My sisters and I do this with clear Christmas balls. You just have to pour the paint inside and swirl it to cover, then turn it upside down to dry.