
This post may contain affiliate links. Please see our disclosure policy.
Cheese platters are my ultimate entertaining trick—zero cooking required, just charm and deliciousness! After 20 years of hosting everything from casual wine nights to garden parties, I’m sharing exactly how I make the prettiest (and easiest) cheese boards.
Looking for more platter inspiration? Check out my Fruit and Cheese Platter, Burrata Cheese Board, Fruit Platter and Dessert Platter! They’re all crowd favorites and super easy to put together!
Pin this now to find it later
Pin It⭐️⭐️⭐️⭐️⭐️
“Love all the tips and tricks to this platter! Was a beautiful spread that did not disappoint!”
—Sara W.
Why I Love Making Cheese Platters for Parties
- No cooking required – Just assemble and serve! It’s one of the easiest ways to feed a crowd without stressing in the kitchen.
- It can double as a meal – Add a little charcuterie, some fruit, nuts, and bread, and you’ve got a full spread that feels elevated and fun.
- Perfect for wine nights – I’ve hosted many wine and cheese parties where the platter was the star. It’s interactive, delicious, and such a charming way to gather.
Over the years, I’ve made themed boards for every season – like my Halloween Cheese Board, Thanksgiving Appetizer Board, Dessert Charcuterie Board, and the best Fruit and Cheese Platter.
No matter the occasion, a cheese board never fails to impress!


How to Choose the Best Cheese for Your Platter
I always say the secret to a great cheese platter is variety—soft, hard, mild, and a little funky. It’s like casting the perfect dinner party, with each cheese bringing something special to the table.
Here’s my go-to lineup (but feel free to mix it up depending on what’s in season or on sale):
- Triple Cream Brie – dreamy, buttery, and always a favorite
- Aged Gouda – firm, nutty, and caramel-y with those little crunchy bits
- Humboldt Fog – tangy goat cheese with a pretty ash line
- Pecorino – a salty sheep’s milk cheese that pairs beautifully with fruit
- Parmesan – a classic for shaving, crumbling, or just snacking on
Don’t forget to let your cheese sit out for about 30 minutes before serving. Cheese at room temp is so much better—like letting it breathe a little before the party starts.


Charcuterie Meats (Optional, but Amazing)
If you want to turn your cheese board into a full meal, add 2–3 meats. These are my go-to favorites:
- Prosciutto – Sweet and salty, great with melon.
- Soppressata – Flavorful and easy to layer.
- Chorizo – Spicy with bold flavor.
- Bresaola – Cured beef, so good with cheese!
Pro tip: Fold, roll, or even make a meat rose for visual charm.

Crackers + Bread
Mix textures and shapes—something crispy, something soft.
- Crostini or French bread slices
- Rustic crackers (I love Rustic Bakery!)
- Breadsticks for height and crunch
- Fruit crisps for sweet bites
Fruits, Nuts & Extras
This is where the magic happens—sweet, salty, tangy, and crunchy all in one place!
Fresh & Dried Fruit: Grapes (on the vine), apple or pear slices (soaked in lemon juice), berries (strawberries, raspberries, blueberries), figs, pomegranate, dried oranges or apricots.
Nuts: Marcona almonds, pistachios, candied pecans or walnuts.
Olives & Pickles: Pitted only! Try marinated olives and tiny cornichons for that extra charm.
Jams & Honey: Fig jam, raw honeycomb, apricot preserves—served in small bowls with little spoons for building the perfect bite.
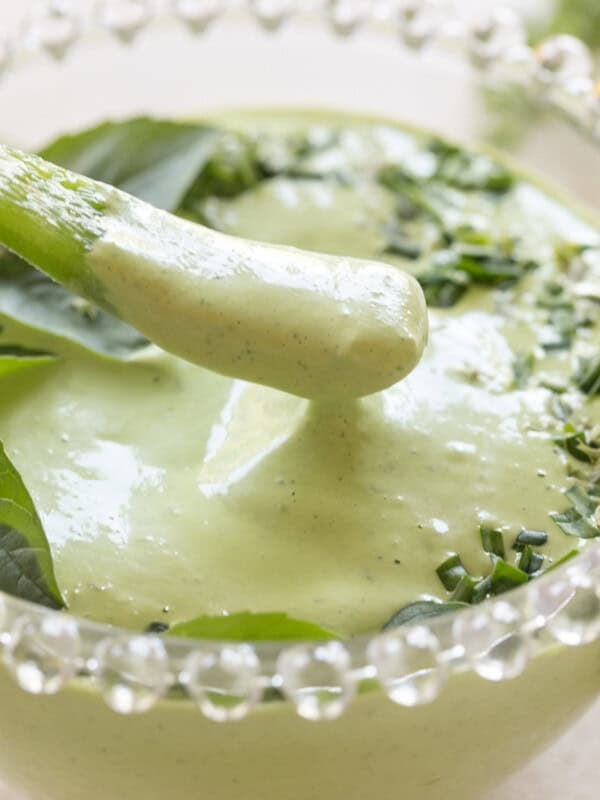
Dipping Sauces: Add a dip, like this easy garlic dipping sauce or this garlic cilantro sauce, for a burst of extra flavor.


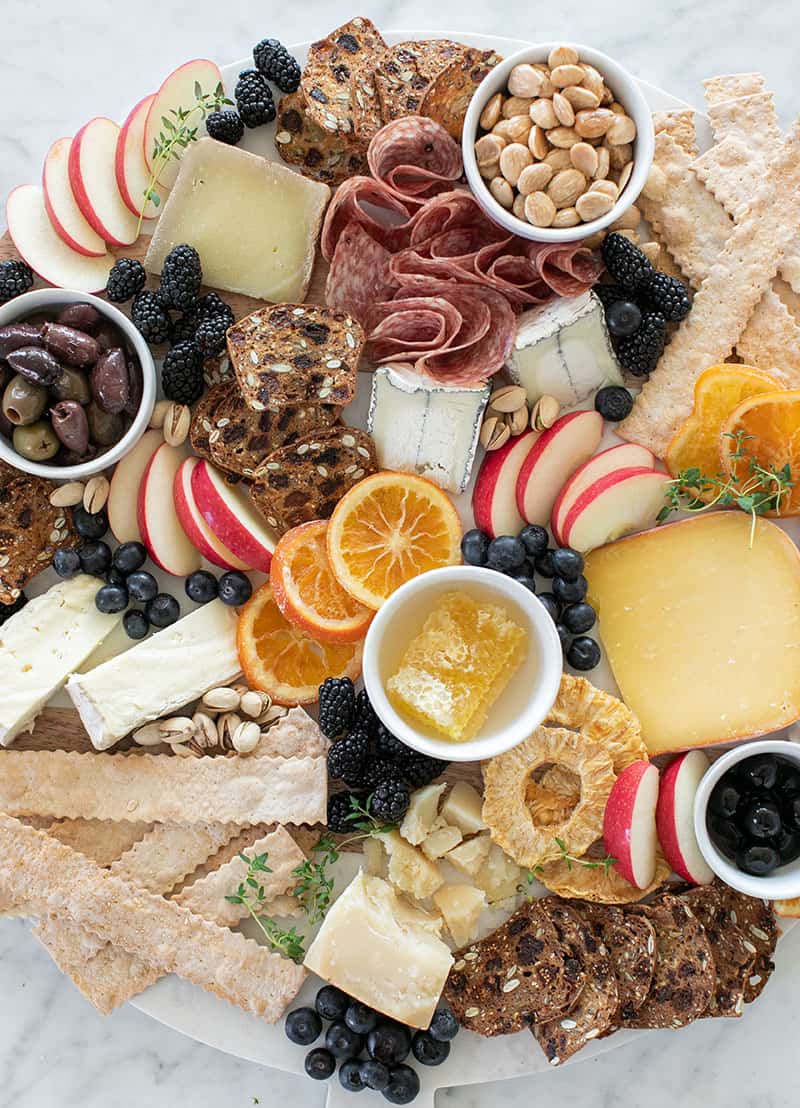
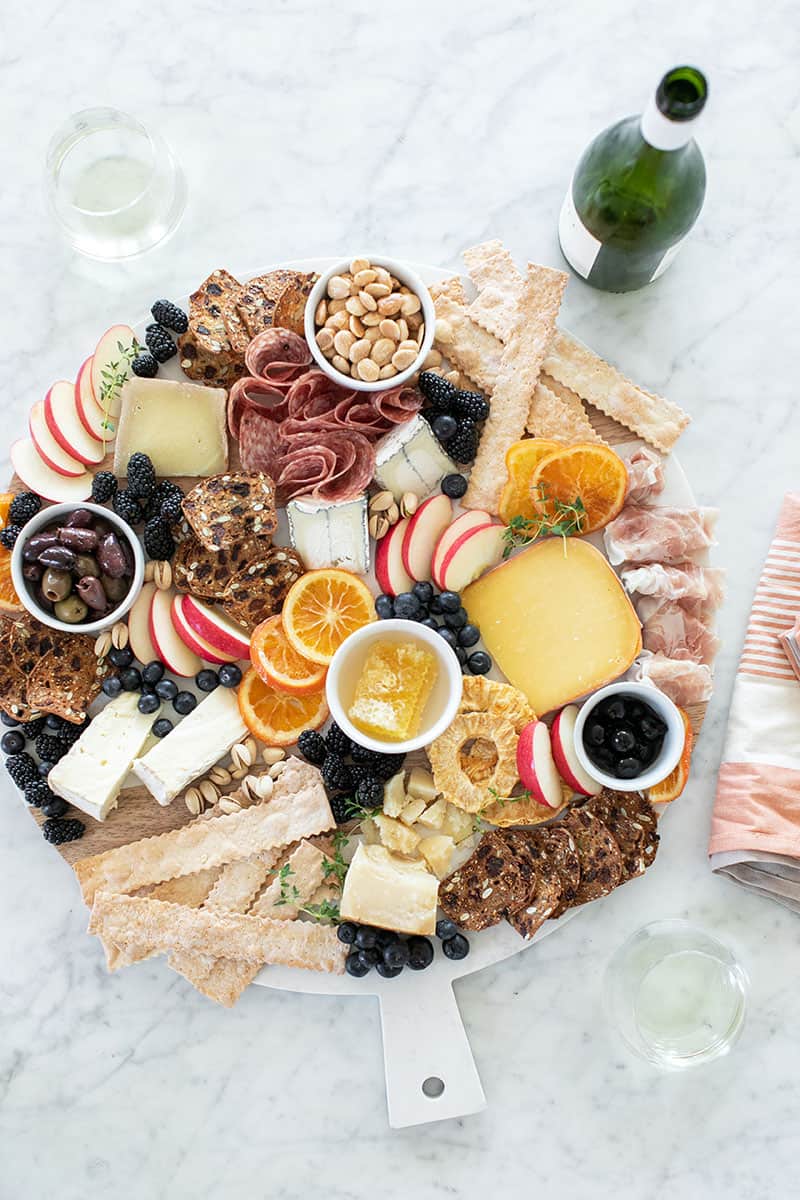
How to Assemble a Cheese Platter (Eden’s 9 Steps)
- Start with cheese – Spread cheeses around the board, mixing textures and shapes.
- Add mini bowls – Fill with olives, jams, or honey and nestle them in.
- Layer in crackers and bread – Fan them out for pretty texture.
- Place meats – Fold or roll for visual appeal.
- Add sliced fruit – Fan out apples, pears, or figs.
- Fill gaps with berries and nuts – This makes the board feel full and lush.
- Garnish with herbs or edible flowers – Adds charm and color. Check out my edible flower list and chart for reference.
- Set out cheese knives – One per cheese is ideal.
- Serve at room temp – Cheese tastes best when it’s not cold from the fridge.
Eden’s Cheese Platter Tips
Mix high and low: Pair that dreamy triple-cream brie with good ol’ sharp cheddar. No one minds a cube of cheddar when it’s dressed up with jam or fruit!
Shop Trader Joe’s & ALDI: Honestly, I get almost everything there—cheese, crackers, nuts, dried fruit… even flowers! Their cheese section is full of gems.
Use what’s in season: Strawberries in spring, figs in fall—seasonal produce is not only fresher, it’s usually cheaper.
Ditch the honeycomb: Swap raw honeycomb for a spoonful of honey in a cute little bowl. Same vibe, less money.
Cut your own cheese: Buying pre-sliced or cubed cheese adds cost. Grab a block and cut it yourself—plus, it looks more rustic and charming that way.
Buy on sale and freeze it: Cheese freezes well, especially harder ones. If you see something on sale, snag it and stash it for your next party.
Don’t stress perfection: A platter full of love (and cheese!) is always beautiful. Avoid big empty gaps and it’ll look abundant and styled—even on a budget.
Add charm with decor: A little sprig of rosemary, a few edible flowers, or something festive like a mini pumpkin or star sparkler makes all the difference.
Frequently Asked Questions
You can prep it a few hours ahead! Assemble everything except the crackers (they can get soggy), wrap it loosely in plastic, and refrigerate. Let it come to room temp for 30 minutes before serving.
Plan for about 3 ounces per guest if it’s an appetizer, or 4 ounces if it’s the main event. If your crew is more into meats or veggies, adjust accordingly. I often keep half in the fridge and refill as needed!
Yes! Use seasonal fruit, buy cheese in blocks and slice it yourself, and mix in affordable options like cheddar or mozzarella. Trader Joe’s is my best friend for this.
Wine is classic (hello, rosé!), but I also love pairing cheese platters with an Aperol spritz or a Hugo spritz or maybe some white wine sangria or even a dirty martini. Just keep it light and fun!
A mix is key! I always say go for soft, hard, and funky. My go-to combo: creamy brie, sharp cheddar, aged gouda, and something tangy like goat or blue cheese.
A cheese platter is a board that includes a variety of cheeses. A charcuterie board is a board that consists of a variety of meats.
More Platter recipes and ideas


Snacks & Appetizers
Greek Mezze Platter

Snacks & Appetizers
How to Make a Fruit & Cheese Platter

Snacks & Appetizers
Burrata Platter with Delicious Marinated Tomatoes
I hope this inspires your next gathering! If you create a cheese platter using these tips, I’d love to see it—tag me @sugarandcharm or leave a comment below. Let’s keep spreading charm, one board at a time!
My new Entertaining book is here! Order Now!

How to Make a Cheese Platter
Equipment
- Cheese Board or Platter
Ingredients
Cheese
- 3 ounces Humbolt Fog Goat Cheese
- 4 ounces Aged Pecornio Toscano Cheese
- 8 ounces Brie
- 4 ounces Aged Gouda
- 4 ounces Aged Parmesan
Condiments
- 1 cup Marinated Olives
- 1/2 cup Marcona Almonds
- 1/2 cup Pistachios
- 1/2 cup Candied Walnuts
Charcuterie
- 6 ounces Napoli Salami
- 6 ounces Prosciutto
- 6 ounces Soppressata
Fruit
- 1/2 cup Blueberries
- 1/2 cup Blackberries
- 2 large Apples, Sliced
- 3 ounces Dried Orange Slices
- 5 ounces Dried Pineapple Slices
Sweets
- 1/4 cup Jam
- 3 tbsp Honey Comb
Instructions
- You want to use a variety of cheeses on your platter. Variety comes in the form of hard, soft, and semi-soft cheeses. Also aged and new.
- Start with a platter or cutting board. Don’t be afraid to choose a larger piece and make a statement with the arrangement.
- Place all of the cheese around the platter. Space them out, separate soft cheeses, cut larger wedges into two, and place next to each other.
- Fill mini bowls with olives, nuts, jam, and honeycomb.
- Place the bowls around the cheeseboard.
- Crackers are a crucial part of the cheese platter. Add them around the platter.
- After the larger items are placed, add the charcuterie to the platter.
- Fill in areas with pretty sliced fruit. Fan the fruit out for a pretty look.
Notes
Nutrition
Nutrition information is automatically calculated, so should only be used as an approximation.


So cute and so helpful!
Thank you so much for sharing this beautiful service site. Your website is very helpful. I love reading your blogs.
Love all the tips and tricks to this platter! Was a beautiful spread that did not disappoint!
This post had so many helpful hints and tricks for building the perfect cheese plate. I love a good board, and this helped make my board even better. I also loved the wine pairing and drink ideas. Thank you!
I love making cheese boards for our gatherings! So fun and pretty too. My guest love it and I can’t wait to make another one!
I love the idea of adding in some berries and other fruits. Most cheese platters I’ve seen just have meats, cheese, and crackers. Perfect to add a bit of sweetness to the mix!
I’ve started making these on Friday afternoons to hold my family over until our late dinner. You have so many amazing options (dried pineapple sounds fantastic!). I’m heading to TJs right now to pick up a few of your suggestions to add to our platter.